A gas nozzle is a godsend for heating a private home. This device has a number of advantages: simple design of the spray device, safety in operation and high efficiency, and therefore its use becomes economically feasible. A gas nozzle for a heating furnace is a device with the help of which a gas-air combustible mixture is created in order to ensure complete combustion of fuel in the combustion chamber. Fuel injectors have a wide range of applications in thermal power engineering. They are installed not only in household stoves, but also in heating boilers of low, medium and high power, operating on gaseous and liquid fuels.
Homemade gas burners
The main components in the manufacture of powerful gas burners are industrial valves. They may be new, but for a homemade device it is enough to use used ones if there is no gas leak. They are designed to work in tandem with a 50-liter propane gas cylinder, which has an angle valve and a reducer.
Burner with valve VK-74
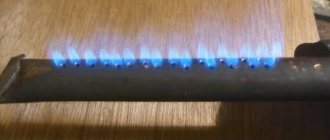
The structure of this burner is shown in Fig. 1. The oxygen cylinder valve VK-74 is used as a basis. A fitting-handle machined on a lathe is installed at the outlet end, to the corrugated part of which the hose from the cylinder is connected. A cap with a prepared hole with a thread for the nozzle is screwed onto the part of the valve with a conical thread K3/4˝, with which it was connected to the gas cylinder. You can use a ready-made blowtorch or gas stove.
The nozzle is made from a piece of 1/4˝ steel pipe 100 mm long and welded to the cap on two pieces of ∅5 mm wire. A distance of 15 mm should be left between the cap and the nozzle to allow air to enter the combustion zone. The position of the nozzle is adjusted by bending the wire holders to achieve a central flame position.
Sequence of actions to ignite the burner:
- Open the cylinder valve;
- Place a lit match near the nozzle and slowly open the burner valve;
- Control gas ignition;
- Adjust the flame using the burner valve
A homemade gas burner of this design has one drawback associated with the location of the valve. The gas flow is directed in the opposite direction to the normal position. Stuffing box seals experience constant gas pressure (including when the valve is closed), so it is necessary to constantly monitor the tightness of the seals.
Burner converted from acetylene gas cutter
If you have an acetylene torch with a faulty oxygen supply valve, do not rush to throw it away. It is also suitable for making a burner (Fig. 2). The mixing chamber requires modifications, the contents of which must be removed to reduce weight. The oxygen barrel and valve will need to be removed. Solder the resulting hole with hard solder. Connect the hose coming from the gas cylinder reducer to a fitting with a left-hand thread M16 × 1.5.
Using a union nut, secure a homemade tip bent at 45° to the mixing chamber to make it more convenient to work with the burner. Screw a flange with a nozzle welded to it onto the thread of the tip.
One of the options for such a burner is to use a cap with an M22 × 1.5 thread. The design of the nozzle here is similar to the nozzle of the burner described above. The homemade gas burner is ready for use.
Gas mini burner
Mini gas burners are more suitable for working with small parts. The mini burner is based on a needle for inflating balls. It is necessary to make a cut in it, a little further than the middle of the needle. Some needles already have a similar hole, which significantly speeds up the work process. Next, you need to take the syringe needle and bend it about 45 degrees in the middle.
Mini gas burner design
It is best to sharpen the pointed end of a syringe needle so that it is straight. After this, it needs to be inserted into the ball needle so that one end comes out through the hole, and the other protrudes from the large needle by several mm. The resulting mini structure should be fixed using soldering. After this, droppers must be attached to the bases of the two needles. Clamps - dropper regulators need to be moved as close to the needles as possible. In the resulting burner they will act as gas and air supply regulators. They also need to be fastened together, and this is best done using a heat gun. All that remains is to connect a source of compressed gas to the finished device, the burner is ready for use. This homemade gas burner can heat objects up to 1000 degrees
You should work with it carefully, observing safety precautions
Masonry
Each stove has its own design features. Its construction must exactly correspond to the drawings. Let's figure out how to build a brick oven and give the average stages of construction:
- It is always correct to make the bottom row continuous. It is the basis of the stove, so close attention is paid to it: the corners must be clearly straight, the verticality of the walls is checked with a weight.
- The second and subsequent rows are made in strict accordance with the drawings. Sometimes, the second row is also laid solid, sometimes a door for the blower is placed in it, and sometimes it is placed next to it higher.
- To make it easy to remove ash, trim the edges of the bricks immediately at the construction stage so that they form a cone.
- When placing the grate, make a small niche for it so that it is slightly in the recess - this will have a positive effect on the efficiency of the stove. Leave a small (few mm) gap between the grate and the bricks. It will be filled with sand and concrete.
- When building a firebox, it is important to combine materials correctly: the inner surface is made of fireclay bricks, the outer surface is made of ceramic bricks.
- A cooking surface is built into the upper rows, if necessary. For it, it is better to take fireproof fireclay bricks.
- Keep track so you don't accidentally block your channels! After several rows, a damper and a ventilation door are formed.
- In the upper rows, the chambers begin to overlap: first the cooking chambers, then the thermal chambers. The top row of bricks covers all channels except the smoke channel.
- The chimney is removed. To do this, in the places where it passes through the floors and roof, gaps are left, which are filled with special insulation. A steel sheet is strengthened around the hole and secured with self-tapping screws to avoid accidental fire.
- For reliability, the stove can be tied with metal ties.
- After all work is completed, allow the structure to dry and settle. It is recommended not to heat the stove for about two weeks after building it yourself.
This is a rough plan for how to build a brick oven yourself. Carry out all work in accordance with safety precautions. Remove any remaining solution immediately. Plastering of internal surfaces is not allowed.
What is a jet (nozzle)
Almost all gas stoves are equipped in such a way that they can operate on both natural gas and propane (from a replaceable cylinder). It should be taken into account that when switching to liquefied gas, it is necessary not only to replace the nozzles, but also to install a reducer, which is responsible for equalizing the pressure of the incoming fuel.
The reducer stabilizes the pressure of bottled gas, ensuring normal operation of the stove. It automatically maintains the pressure parameters necessary for the operation of the equipment and prevents backflow of the medium
A nozzle (nozzle) is a bolt with a hole in the head for supplying gas to the burner. After entering the burner, the gas is mixed with air, and the gas-air mixture is ignited.
The nozzle ensures that gas enters the burner in the required volume and at the appropriate pressure. Its size determines the volume of gas required for the normal combustion process
Depending on the fuel used, nozzles are of two types: for supplying blue fuel from the main pipeline and for supplying gas from a gas holder or cylinder.
Jets (nozzles) for natural gas in comparison with jets for liquefied fuel are characterized by:
- Shortened bolt body;
- Fewer threads;
- Increased hole diameter.
If the stove is not operating correctly, it is best to replace not just one jet, but the entire set at once, and when switching to bottled gas, this is generally a necessity.
Why and why is it necessary to change the jet?
Jets for different types of gas vary significantly, so when changing the type of gas-air mixture, replacing the nozzles is simply necessary
If you pay attention to the diameter of the hole, it becomes obvious that they are not the same. In this case, the diameter of the hole depends not only on the type of gas used, but also on the size of the burner itself
Some time after replacement, negative factors may appear indicating that the stove is not working properly. Don’t rush to change the jet right away; you may be able to limit yourself to cleaning it
Each of the gas stove burners differs in power and size, so for stable operation it is equipped with a separate nozzle.
The diameter of the outlet of each nozzle is calculated for a certain volume of gas supplied from the main line or gas tank
The more powerful the burner, the greater the volume of gas it requires to operate, therefore the diameter of the nozzle is required to be larger.
Choosing a nozzle for bottled gas
As already mentioned, the propane nozzle has a shortened body and a smaller outlet diameter. It is not recommended to try to reduce the hole yourself, since even fractions of millimeters are important here. By eye you can only improve the operation of the stove, but not achieve its ideal operation.
It is important to understand that standard jets simply do not exist. They are designed for each specific model
Modern kitchen stoves are equipped with a set of jets designed to operate on propane. Some models are even produced specifically for bottled gas.
A set of nozzles for a specific model can be purchased at a specialized gas equipment store or directly from a representative of the official supplier
Design of a homemade gas burner
- metal case;
- gearbox;
- nozzle;
- fuel supply regulator;
- head;
- a unit for securing a gas cylinder.
The metal case includes a special glass, with the help of which the mechanism eliminates the possibility of blowing out the flame. This also includes a metal or other handle that does not exceed 100 centimeters. A wooden holder and a gas hose are installed on top of the handle. Using a reducer and a tube with a valve, the gas supply level and its length are adjusted accordingly. The nozzle is used to ignite the fuel, in this case the latter is propane.
Product cost
| Gefest | 400 RUR |
| Moravia 1436 | 650 RUR |
| Indesit | 650 RUR |
| Hansa | 650 RUR |
| Flama | 550 RUR |
| Darina | 700 RUR |
| Ricci | 590 RUR |
From the above it follows that the operation of changing jets is not difficult and is quite within the capabilities of any person without special education. And installing the right nozzles will not only save gas fuel consumption, but will also rid the room of soot and unpleasant odors.
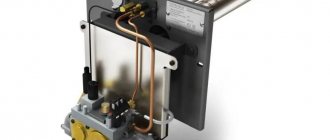
Equipment setup
Floor-standing gas boilers with an atmospheric burner can be configured independently. Pressurized systems are regulated by an automatic control unit and do not require additional configuration.
Scheme of actions for setting up single-stage equipment:
- Install the device on the boiler.
- Connect to the gas pipe.
- Check for absolute tightness.
- Remove the burner housing.
- Using a pressure gauge, measure the gas pressure at the inlet.
- Connect to electricity. Make sure that the jumpers and phases are connected correctly.
- Place a gas analyzer in the chimney pipe.
- Start the device.
- Using a pressure gauge, take pressure readings at the outlet of the burner block. Pressure readings must correspond to the parameters indicated in the data sheet.
- Adjust the air flow using the air damper.
- The gas analyzer readings must also comply with all gas equipment installation standards.
Setting up gas equipment should be carried out by specialists. The simplest open-type boilers can be configured independently if you have certain skills and knowledge of the design of the burner unit. The efficiency of the boiler, its level of efficiency, and fuel consumption depend on the quality of the burner. It is possible to superficially determine that the equipment is malfunctioning by the changed burner flame.
A heating system where the main element is a gas stove is a common type of heating for private households and cottages. There are many things in favor of natural gas as a heat source: high efficiency, environmental friendliness, and the ability to make the heating process fully automated. The fuel itself is also the most inexpensive at present, unless, of course, you take into account wind energy and solar radiation. But these methods have not yet found wide demand due to the unaffordable price of the equipment.
The quality of gas heating depends on how efficiently the gas burner for the stove works.
Purpose and principle of operation
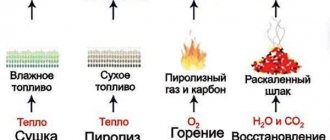
It does NOT matter in which country the tandoor was used, but all these ovens worked on the same principle. Firewood was placed in the lower part of the oven, the ceramic walls retained even heat for a long time, and many different dishes could be cooked inside the oven
When the firewood turns into coal, it is partially removed, and the rolled out dough is placed on the walls of the oven, which after a very short time turns into a fragrant flatbread. The meat is cooked either on skewers like shish kebab, or in ceramic dishes, which are placed on special brick stands installed at the bottom of the oven.
The main advantage of an Asian stove is its ability to maintain a high temperature for a long time with a small amount of fuel. In addition, the food is not fried, but baked inside the oven, retaining all its beneficial properties.
Since ancient times, stoves were buried or built directly in the ground, this allowed them to save building material. But these days, you can choose any type and size of oven, which will cook your favorite dishes many times faster.
Furnace materials
ceramic bricks
for the stove it is allowed to combine them with fire-resistant fireclay bricks. The inner surface of the firebox is laid with fireclay bricks, the outer walls are made of ceramic.
You cannot use hollow stones for the construction of stoves, as well as poorly hardened ones. You should not skimp on building materials: brick is the basis of the stove, it must be of the highest quality.
A solution is needed to connect the stones. It is prepared from clay (preferably fireproof) and sifted sand. The clay is soaked in water for several days, then mixed with sand. There are no exact proportions of the solution; approximately the same amount of sand is taken per part of the clay and diluted with ¼ part of water. The finished solution should be very plastic, but not excessively liquid.
You will also need metal parts: cast iron grates, dampers, grates and doors. When calculating how much to spend on a stove, remember that all materials must be of high quality.
Making a nozzle with your own hands
Before you start using a product made at home with your own hands, you need to go through the following procedures:
- The burner must undergo a quality check at the local Rostechnadzor office in accordance with the regulations established in the Federal Law on the Safety of Buildings and Structures dated December 30, 2009.
- After this check, it is necessary to obtain a certificate from Rostekhnadzor regarding the suitability of the burner for operation.
In order to start making the nozzle, you need the following materials:
- A valve that will serve to regulate the fuel supply of the device. To supply gas to the burner, you must use the valve installed on the gas source.
- Steel pipe. It is desirable that it have a thickness of up to 2 mm and a length of up to 100 mm.
- Steel cap for making a fuel dispenser. You can also use a jet from a blowtorch.
- Steel handle. It can be made from a regular fitting.
- Rubber for handle lining.
- Wire. It will be used for welding.
You will also need the following tools:
- Welding machine.
- Grinder for cutting parts.
For homemade production, an atmospheric nozzle is preferable due to the simplicity of its design. The procedure is as follows:
- First, screw the cap onto the valve. For example, if a standard VK-74 valve is used, then the cap has a conical thread.
- Then, by cutting the existing steel pipe with a grinder to the required size, the nozzle of the future nozzle is made - its basis.
- Next, the nozzle is welded to the cap using wire. In this case, the cap and nozzle should not touch.
- A piezoelectric element is installed, which is needed to activate the device.
After this, the product is ready for installation.
Attention! To install a system for supplying fuel to the stove from a central heating system, you need special equipment and experience working with gas systems
Furnace installation
When installing a finished unit in a furnace, take into account what materials it is made of:
The gas nozzle - the heart of the stove - must be of high quality and correctly installed. If this unit malfunctions, fuel-related problems may occur, which can lead to irreversible consequences.
Foundation
Ideally, when constructing a building, the foundation for the furnace will already be laid. Until recently, this is exactly what they did in the villages. What to do if there is no foundation? Let's build it with our own hands.
You need to dig a hole, the perimeter of which will be slightly (see 15) larger than the perimeter of the stove. The bottom of the pit is covered with sand, and the sides are reinforced. Then the concrete mixture is poured.
The concrete must harden well; up to 2 weeks are allotted for this. When working, check the surface with a level; it must be flat and strictly horizontal and 10-16 cm below the main floor. A roofing felt sheet folded in half is placed on top, then a steel sheet and an insulation bedding.
For stoves used in outdoor dachas, the foundation is not deep and just above the ground. The same applies to stoves that will be in the garden.
Types of burners
According to their design and functional differences, burner devices are divided into:
By purpose:
- for high power industrial equipment
- for household equipment.
By type of fuel used:
- devices for natural gas;
- devices for liquefied gas;
- universal devices.
By adjusting the flame:
- single-stage – capable of operating on/off;
- two-stage (as a variation - models with smooth modulation) - operate at full power, when the desired temperature is reached, the flame is reduced by half;
- modulating - boilers with a modulating burner are characterized by smooth adjustment of the flame power.
According to the principle of operation:
- injection/atmospheric. They operate by supplying air from the room. They are installed respectively in open combustion chambers. Also used for old-style boiler models.
- fan/supercharged. They work in isolated combustion chambers. Combustion air is supplied by a fan. According to their design features, they are divided into: - vortex (round-shaped nozzle holes) - direct-flow (shape of a narrow slot with a round/rectangular cross-section).
- diffuse-kenetic. Air enters two simultaneously: one is mixed with gas fuel, the second is added directly to the chamber during combustion.
Operating principle and differences of gas equipment
You cannot objectively judge the quality of the purchased injector. Do not disassemble the finished product in search of possible defects. So there is a chance to damage rather than check an expensive device.
By assembling each element of the burner yourself, you will receive not only pleasant satisfaction from the work done, but also savings. At the same time, the operation and repair of gas bath equipment will become safe and conscious.
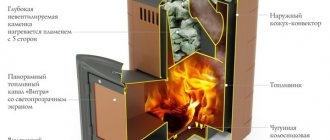
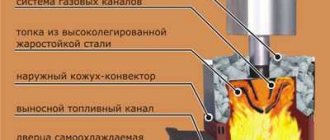
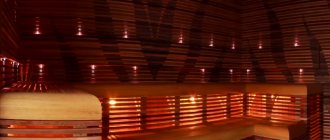
The heating gas unit is a sauna stove body with a gas supply device located in it. Here are the main elements of the control mechanism with which the fuel supply is regulated.
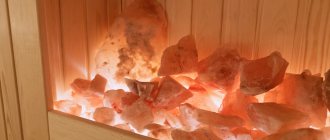
The burner heats the air in the firebox. The thermal energy of the nozzle is transferred through the body to the tray with stones
A heating stove with a gas nozzle requires special attention to the chimney, which must be cleaned periodically.
The advantages of heating water and sauna stones with a gas burner include:
- Simplicity of the workflow. To heat up, just turn the valve and ignite the gas in the burner. In an hour, the steam room of the bathhouse will be sufficiently heated.
- Environmentally friendly. During operation of a gas device, harmful emissions during gas combustion have the smallest volume compared to other types of fuel.
- Ease of maintenance of the burner and the stove itself. There is no need to deal with soot from walls and remove waste, as with coal or firewood.
You can equip the oven with special sensors that are triggered at a critically low exhaust speed. In this case, the gas supply is automatically turned off.
Inexpensive fuel from a gasified stove allows you to not limit the number of bath procedures. Even with daily heating of the bathhouse, maintaining cleanliness becomes very easy
Such a disadvantage of a homemade burner, such as additional registration of technical permits, pays off due to high productivity. Using a gas injector will save 30% costs compared to solid fuels. Heating a sauna with gas is two times cheaper than using an electric boiler.
Ignition type
All burners can be divided according to the type of ignition:
- Electronic type. They do not have a constantly working igniter. Requires electricity to operate. Electric ignition is one of the most convenient inventions for modern heating units. Thanks to him, the operation of the stoves has become as comfortable as possible. Electric ignition makes it possible to light the burner flame safely, without using available wicks or lighters.
- Burners with piezo ignition. No electricity needed.
Sometimes special working conditions are required, for example, burners are placed in a sauna stove, which must distribute the flame well. These are dividers or ordinary distribution tubes. This is how kitchen gas ovens work.
The fuel consumption passing through the burner can vary widely and depend on its design.
Gas burners for your furnace should be safe and energy efficient. This can be achieved if all technical requirements are met. Self-indulgence in this matter can only do harm. Therefore, the installation of gas burners must be carried out by specialists.
Modernization of heating equipment
Any home craftsman can install a homemade atmospheric gas burner for a sauna stove. So, without any special costs, a solid fuel boiler can be converted into a gas one.
Equipping an existing solid fuel stove in a sauna with a factory-made gas burner unit will require some adjustment. You will be faced with the need to modify the dimensions of both the burner and the combustion chamber of the wood-burning stove.
Converting a solid fuel sauna stove into a combined gas and wood stove is within your power, but it will require precision and some effort. Do not allow the flame to come into contact with the walls of the firebox
To heat the combustion chamber evenly, the burner should be positioned closer to the bottom of the stove and strictly in the center. It is unacceptable to place the source high and offset in any direction. In this case, the camera will not warm up completely. And the flame from the burner can touch metal parts or the heater of the sauna stove.
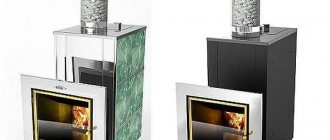
Purchased stoves
When planning to install a stove in a bathhouse or in a house, pay attention to the finished products. Modern stoves can be made to order, taking into account all your wishes.
It is better to entrust the installation of finished stoves to a professional. This is especially true for stoves with a gas nozzle: jokes with gas are bad and, if you do not have sufficient knowledge, you should not take the risk. A professional installer of gas furnaces will do everything quickly and efficiently, guaranteeing the reliability of the structure and its safety.
To install a stove in the country or in the garden, pay attention to ready-made structures. For example, barbecue ovens. There are a huge variety of them, starting with mini options and ending with large units. They are supplied disassembled and supplied with assembly instructions. Following these instructions, it will not be difficult to assemble and install them yourself.
Source pechinfo.ru
How to choose?
What you need to pay attention to when choosing a burner device for a boiler:
- productive power - noise level during operation (applies to supercharged models) - type of heating equipment for which the burner is purchased - type of fuel - pros and cons of this device - provide for possible malfunctions in the operation of the local gas supply line.
Taking these factors into account, you can choose the most suitable burner device for your boiler so that it operates as efficiently as possible without the burden of frequent preventative maintenance.
DIY instructions
Next, we will talk about several options for homemade propane burners that you can make with your own hands. In order to build a simple burner, you won’t need a lot of effort and skill, but creating the other two options will require you to work harder.
Option 1 - the simplest burner made from a piece of pipe
Building such a burner will require very little time and effort. But the process of creating a homemade product must be approached with all responsibility, because you will have to work with an explosive substance and any error in the design of the device can lead to dire consequences.
Using such a device, you can heat metal blanks for forging or warm them up before welding, and you can also repair bitumen roofing. The owner of a private house will definitely not find such a homemade product superfluous.
A properly made propane burner will last a long time. With its help you can perform many household tasks without using a number of expensive tools.
To make a homemade gas burner you will need the following tools and materials:
- two pieces of pipe of different diameters;
- union;
- gas hose;
- gearbox;
- propane tank;
- welding machine;
- Bulgarian.
Having prepared all the tools and materials, you can begin assembling the propane burner. But before that, we recommend that you familiarize yourself with the rules for safe work with an angle grinder.
As you can see, there is nothing complicated about assembling a gas burner yourself. Having studied the instructions and having the necessary set of tools and materials at hand, assembling the device will take no more than an hour.
Option 2 - powerful gas burner
We also suggest trying to assemble a more structurally complex, but also more powerful burner.
To build this option, you will need a little more tools and materials, but the result will not disappoint you.
Such a propane burner can be used, for example, for melting metal in a forge, for burning weeds in your own area, as well as for other purposes
So, to build a propane burner you will need to prepare the following materials:
- connecting couplings – 1/2” and 1/4”;
- threaded barrel – 1/2” and 1/8”;
- plug with internal thread – 1/8”;
- foot – 1/4”*1/8”;
- nipple – 1/2”;
- quick connector for low pressure gas equipment;
- propane supply regulator – 0.068-0.34 atmospheres;
- thread sealant;
- a metal sheet;
- self-tapping screws;
- drills – 6.4 mm and 0.8 mm.
It is better to give preference to brass products. In addition, to construct a homemade product you will need the following set of tools: an adjustable wrench, a drill, a punch, solder and flux, a blowtorch.
Having prepared everything you need, you can begin assembling the device.
During work, do not forget that propane is an explosive gas, and any failure to comply with safety regulations can lead to irreversible consequences.
Therefore, before testing the device, it is necessary to check all connections for leaks. And only after making sure that there is no leak, you can start working with your homemade product.
Option 3 - miniature burner model
Let's look at another option for a gas burner that runs on propane. This miniature gas burner is often called a Bunsen burner.
The peculiarity of this device is that you can hold it freely in your hands without fear of getting burned. Let's try to assemble it with our own hands.
To work you will need:
- Old gas burner.
- Thin copper tube 10 meters.
- Copper wire.
- Needle from a medical syringe.
- Bolt No. 8.
Having prepared all the necessary materials, you can begin to create our homemade product.
To do this, we will use the following instructions:
Now you know how to build a gas burner with your own hands and what you will need for this. As you can see, there is nothing complicated about this; it is enough to follow the rules for the safe operation of equipment, which we will discuss a little below.
Kinds
Burners can be of different types. Let's look at the main ones.
Atmospheric
Such devices are quite cheap. The reason is obvious - their production is not too difficult technologically. The operation of atmospheric burners is also simple. Air is sucked directly from the surrounding space. The formation of a gas-air mixture does not require additional effort.
Supercharged
This option uses a fan that actively pumps air. Stabilization of air pressure (pressure) allows you to compensate for almost all negative external factors
What is important is that “fire separation”, which often occurs with atmospheric burners with a significant increase in pressure, is also excluded
The following evidence supports such devices:
- stable operation under any conditions;
- efficiency of 95% or more;
- a fairly high level of safety (determined by the design);
- almost complete combustion of fuel;
- wide range of achieved powers;
- excellent level of automation;
- Possibility of use in furnaces and boilers of a wide variety of structural types.
It is worth noting that forced-air burners are much more expensive than their atmospheric counterparts. Even the most affordable models of this kind cost at least 4.5 times more. However, the main technical advantages fully justify such a fee. When the burner is operating with supercharging, noise of varying volumes may occur. Special protective covers will help to cope with this problem.
Such models are approximately twice as efficient as traditional flare designs. Some people even take tourist-type ceramic burners (for cylinders) and convert them into a boiler or stove. But you can do this only with complete confidence in your actions.
Criterias of choice
Tandoor has been known since the 10th century in all countries of the East and Transcaucasia. At that time, all such stoves were made of special clay and heated with wood. But in the modern world, tandoors are made of ceramics, clay, brick and metal. According to the heating method, tandoors are divided into wood, coal, electric and gas.
What does a tandoor burner look like?
Clay tandoors are made according to the classical model. But not all clay can be used to make a stove, because at high temperatures (up to 500 degrees) the stove can crack.
Today, Uzbek ceramic tandoors, made of clay taken near Akhangaran and fired to the state of ceramics, are very popular.
Brick tandoors are built from bricks of a special shape and size. They are laid in a semicircle to preserve the classic shape of the stove and secured with clay mortar.
In the Middle Ages, ceramic tandoors indicated the high social status of the owner, since they were made large and decorated with small ceramic tiles covered with bright ornaments. Only wealthy people could afford such a stove.
Metal tandoors are made in factories and most often they are installed in public places: cafes and restaurants. Such ovens come in various sizes and shapes: they can be rectangular and polygonal, spherical and square. A clay oven with thermal insulation is installed inside the metal body to retain heat for as long as possible. These stoves are usually wood-fired, but there are also gas stoves.
Metal tandoors usually have gas burners; they run on natural gas. A gas burner and a sheet of reflective plate are cut into the body of such a tandoor to remove the flame. These ovens are easy to use, economical and allow you to quickly prepare many delicious dishes. But their installation requires professional knowledge and skills.
The advantage of gas tandoors is the ability to install them indoors, the only condition being proper ventilation.
Gas ovens typically have temperature controls, no automatic ignition, and a removable lid. Stones are used to obtain even heat.
What types of burners are there?
If a gas burner is considered from the point of view of the method of controlling thermal power, then all models can be divided into the following categories:
- Single stage. In this case, gas supply (switching off) occurs automatically, based on a rheostat signal.
- Two-stage. The burner has the design ability to switch to an economical mode. This process is regulated automatically.
- Burners with floating adjustment. The burner power can be changed smoothly, from 10 to 100 percent.
Burners are divided according to the method of air supply:
- Atmospheric. In this option, no electricity is needed; air flows to the burner under the natural action of draft. The efficiency is not very high, no more than 90 percent. This is a simple design: a pipe with holes into which fuel is supplied. It works in open combustion chambers. They can be quickly converted, if necessary, to use liquid fuel; the service life of such burners is very long. However, such burners impose increased safety requirements.
- Supercharged. They are also called blower or fan burners. This is a rather complex design. Air is supplied to the burner by a fan; in this case, the combustion chamber is closed. Efficiency exceeds 95 percent. Stoves with such burners do not require bulky chimneys. At the same time, the furnace operates stably even at low gas pressure. However, they produce a lot of noise and are volatile.
- Diffuse-kinetic. The air is partially pumped into the combustion chamber, the rest is supplied directly to the flame.
Date: September 25, 2022
Combustion conditions
In order for a homemade burner to work during mining, several requirements must be met.
In particular, oil will burn best when heated and atomized. It is not difficult to fulfill these conditions; the article provides several options for burners that have a powerful flame of fire, and most importantly, a large amount of thermal energy is released. It should be noted that it is allowed to fulfill at least one condition - to provide heating or atomization. True, the efficiency will be somewhat less.