The services of professional roofers are quite expensive, so if the budget for building a private house or garage is limited, it is worth saving by doing the roof installation yourself. Of course, this work is not easy and very responsible, but if you prepare well, read the instructions, and carefully watch the video lessons, then any craftsman who knows how to hold a hammer in his hand can handle the installation.
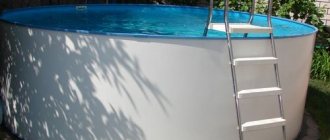
Private construction today is quite widely developed. Many take on the task of independently building extensions, drywall and even cottages. To cover the roofs of private buildings, most people choose soft roofing. After all, this material is very convenient to work with.
The material is quite light, it can be used on roofs of various shapes, and the coating is reliable and durable. In addition, the soft roof is quite “quiet”; during rain and even hail, it does not create much noise.
How to choose threads for knitting a washcloth?
Threads come in different thicknesses. The thicker the thread, the stiffer the finished washcloth will be. Select threads of such thickness that it is convenient to use them for crocheting No. 3-4. Although the most delicate and soft washcloths are crocheted with No. 2 crochet, i.e. with thin threads. Some people like washcloths that are harder and denser, while others like them softer.
Buy bright threads to match your bath accessories. For children, it is better to knit a washcloth from thin threads in the shape of a mitten or a funny animal.
Before the first use, be sure to keep the washcloth in boiling water for 5-7 minutes, the washcloth becomes pleasant to the body and lathers well.
Polypropylene yarn
Video: how to make a hammam with your own hands in the basement of a house
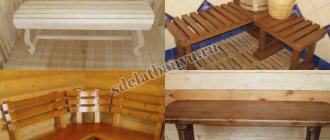
You need to choose finishing material based on personal preferences and financial capabilities. The floor, walls, benches and other parts are covered with the same material. All elements of the bathhouse must have a good waterproofing coating. This is necessary to maintain the building in excellent technical condition.
Construction of a hammam is a costly process in terms of time and finances. If you prepare for this task, then it is possible to achieve success - to build a high-quality building in which friends and relatives can relax with great pleasure.
- Author: misaf
Rate this article:
- 5
- 4
- 3
- 2
- 1
(13 votes, average: 4.2 out of 5)
Share with your friends!
What threads are best for knitting washcloths?
Let's take a closer look at each type of thread. Among the natural fibers suitable for knitting washcloths are:
- Hemp made from hemp fibers.
- Jute is made from textile fiber. It makes hard products.
- Bast is rich in naphytoncides, but is short-lived.
- Cotton is not very practical for washcloths.
- Wool is often used for washcloths.
- Sisal is obtained from the fibers of agave leaves and is used mainly for washcloths. It has good foaming properties and effectively cleanses the skin, providing a scrub effect.
- Linen fibers are soft, durable and dry quickly, and over time their qualities only increase. Such washcloths have numerous therapeutic and health effects on the body.
Yarn from natural fibers
Knowing the disadvantages of natural materials, housewives still give preference to synthetic fibers:
- Nylon and nylon threads, which are often used to strengthen wool. Often unwearable tights and stockings are turned into original peeling items.
- Polyethylene and the strips of plastic bags produce high-quality bath accessories.
- Viscose.
- Acrylic fibers.
- Polypropylene, the most practical and popular material for needlework.
- Rubber (rubber), today chemists have learned how to produce rubber yarn, although it is rare on sale.
- Polypropylene yarn, which has increased strength. It is convenient to work with, and knitted products take good care of the body. Today, housewives have begun to combine polypropylene thread with other types of yarn, so the products come out soft and durable. Often in master classes, when knitting, pieces of foam rubber are inserted inside to give the washcloth softness.
Crochet hooks for washcloths
Flat roof technology and materials
A flat roof has a smaller area than a pitched roof, and for this reason alone it is cheaper.
Money is also saved and, due to the absence of a rafter structure, roll waterproofing materials themselves have a lower cost than tiles or metal. For domestic private housing construction, flat roofs are not typical. Many homeowners consider them to be attributes of industrial architecture and high-rise buildings. However, as soon as you move a little further west, for example, to Poland, cottages with flat roofs appear in large numbers. And this is not surprising, because the Poles are the closest neighbors of the Germans, and they know a lot about saving. In Germany there really is a huge number of private houses of post-war construction with a flat roof.
Recovering from the devastation, the Germans were forced to count every penny. And although houses with flat roofs were not traditional for them at that time, they began to build them. It was primarily the economic advantages that had an impact. Construction time was also reduced due to less complex and labor-intensive installation.
There are also functional advantages of flat roofs. First of all, this is the rational use of the space of the upper floor, due to the absence of inclined slopes. Additionally, the horizontal design of the roof makes it easier to inspect and repair. A flat roof can be made usable: arrange something like a terrace there, place air conditioning units or supply and exhaust ventilation units.
As for the climatic factor, the only limitation for building a flat roof may be regions where heavy snowfalls are typical. There it is better to have a pointed pitched roof, like you see in the Alps.
Brands of yarn for washcloths with elongated loops:
- “The Needlewoman” , produced by the Pekhorsk factory. Yarn composition: polypropylene-100%. Thread length: 200 m. Skein weight: 50 g.
- “For the soul and soul” , manufacturer: Hostess-Needlewoman. Yarn composition: Polypropylene 100%. Thread length: 250 m. Skein weight: 50 g.
- “Craftswoman” , Skein weight: 50 g. Thread length: 200 m. Composition: 100% polypropylene. Manufacturer: Russia.
- ADELIA "RAFFIA" . Weight, g: 50. Thread length, m: 200. Composition: 100% polypropylene.
- Just nameless yarn in bobbins for knitting washcloths.
Shape of the washcloth
A washcloth with elongated polypropylene loops can be knitted in the form of a pipe in a circle. It is convenient to insert foam rubber into such a washcloth.
You can knit a flat rectangular washcloth according to the usual pattern using single crochets (only every third row is knitted with elongated loops):
Rectangular shape
The crocheted washcloth can be oval-shaped (in this case, every third row is also crocheted with elongated loops):
Oval shape
A washcloth can be crocheted in the form of a mitten with or without extended loops:
Hedgehog diagram
Round washcloth (do not forget to knit every 2 or 3 rows with elongated loops):
Diagram of a round washcloth
A crocheted washcloth for a child can be crocheted in the shape of any toy with elongated loops.
How to knit elongated loops?
If you have never knitted with elongated loops, then you should first try to knit a sample from simple threads in order to practice and work on the tightness of your knitting. The point is that you need to knit tightly with long loops, i.e. tighten each loop with columns so that the fabric does not become loose. It will be especially difficult for beginners to knit immediately elongated loops from polypropylene threads.
Knitting pattern for elongated loops
Extended loops
Knitting elongated loops on a ruler
How to knit a washcloth with elongated loops for beginners step by step
When creating such a model, it is enough to know the basic basics of creating “shaggy” loops. Let's look at the process step by step:
Loofah with elongated heels
- First you need to create a chain using air loops (VP).
- After going through 3 rows with a single crochet (STBN), we make a VP, then repeat STBN.
- By inserting the hook into the previous row, we create a loop.
- Picking up the thread from below with your finger, we make a large ring.
- Then, threading the hook through the loop of the fabric, grab the thread and pull it through. Grab the working thread again and pass it through three loops.
- We knit until we get the fabric of the desired size.
Knowing the stages of knitting elongated loops, you can start creating a bath accessory:
- We will connect a row of VPs into a circle. Its size will determine the width of the washcloth. Usually 40 loops are made.
- Having knitted 7 rows of STBN, we make elongated loops in the 8th row. They should remain on the wrong side.
- The length of the washcloth is determined by the craftswoman herself.
- We complete the work by knitting several rows of STBN, then collecting them in a circle.
- We make handles from a chain of loops. Their length is determined independently.
- The product is turned inside out and must be washed. To give the accessory softness, be sure to pour boiling water over it.
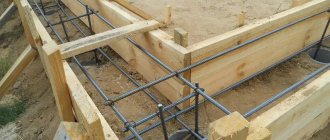
Drawing up a project drawing
To prevent the bathhouse from causing problems due to improper planning and construction, it is important to first assess the possibilities. Construction of an oriental bathhouse is a long and expensive process. But if you have already decided to build a hammam, then be sure to draw up a plan for all stages:
- take measurements of the room taking into account the design of the ceiling and the dimensions of the planned equipment;
- draw up a design project for a Turkish bath, including decoration, location of sunbeds and kurna;
- plan the placement of lighting fixtures, steam generator, sewer outlet and ventilation;
- think over a heating system for the floor base, walls and sunbeds.
If the bathhouse is located in the house, then special attention should be paid to covering the walls and installing thermal insulation. The walls must be treated with a special agent that prevents the destructive effects of moisture. Waterproofing must be done so that the construction does not cause damage to a private home and lasts for many years. An important nuance is maintaining heat inside the room using thermal insulation. This will make it possible to conserve resources and prevent nearby rooms from heating up.
You can make a design project yourself or order it from a specialist, specifying all measurements and finishing material. The door is made of glass or wood.
Today you can find a large number of ready-made hamam projects.
The hammam water heating diagram helps to see how the heat is distributed inside the structure
The construction plan begins with drawing up a ceiling design. The layout depends on its dimensions. The tilt is made so that the resulting drops immediately flow down the edges and do not accumulate on the ceiling. Therefore, the height of the ceiling structure at the extreme point is determined to be at least 2.7 m. At a height of 2.2 m, the dome should turn into a condensate tank. The angle of inclination of the dome walls should not be large.
If the structure is designed incorrectly, you can lose a significant part of the room's area. The room itself is made flat, rounded or in the form of a honeycomb. You can provide electrical energy to the lighting devices in the steam room using a step-down transformer.
A step-down transformer is used in various types of baths to reduce operating voltage
A prerequisite for the full operation of the steam room is the presence of a technical room: it will contain a steam generator and the main systems for ensuring the operation of the hammam. This is a small room or just a compartment with a door adjacent to the main room of the hammam. Its optimal size is 1.5 m².
It is important to provide ventilation outlet to the outside. The steam will cool and settle on the walls of the duct. Errors in design can lead to the accumulation of liquid in the recesses of the ventilation duct and the formation of mold.
Video: hammam on the second floor of the house - tricks for installing all systems and arranging the room
How to draw up a ventilation diagram
Inside the hammam, an optimal temperature is maintained with air circulation. Ventilation is either in-line or forced. Pipes for ventilation can be installed in place of the dismantled window. Important things to consider:
- design features;
- room layout.
The air duct pipe must be sealed and have a groove to drain moisture from evaporation. The product is made of stainless steel. Mixed ventilation is usually used. The room is planned to have 2 ventilation holes located opposite.
In some cases, multi-level ventilation is installed, then the recesses are located at different heights. In this case, it will be possible to maintain the required temperature all year round.
The Turkish bath is divided into several rooms with different functions
Ordering a hamam diagram from a company will be expensive, but it will eliminate errors and problems during the construction process.
Dimensions of the Turkish bath
You should not make a large steam room: the larger the building, the more power the steam generator will need. Its power is calculated by the formula: V x 0.7, where V is the volume of the room.
For a family of 4–5 people, a room measuring 2.5 x 2.5 m is sufficient. Statistics show that 80% of baths have an area of less than 8 m². Large hammams are built if it is necessary to place a massage table, the dimensions of which are 0.8x2 m with a height of 70 cm. The minimum size of a hammam for 1 steam generator is 3.5 m2.
Inexperienced craftsmen make a table 80 or 90 cm high, but this is wrong. Since it will be inconvenient for a short person to massage a visitor.
Insulation, finishing and waterproofing materials take approximately 3–4 cm of thickness from the dimensions of the room. The reinforcement will take another 2–3 cm. In the drawing this is indicated by a separate wall.
The more accurately the plan and drawing of the premises are drawn up, the less likely there are errors during construction
In the Turkish bath you can plan:
- flat resting bases - 47–50 cm;
- structures for lying down - 70–75 cm;
- designs with backs - 65–70 cm;
- curved seating structures - 100–120 cm;
- shelves with a bend - 150–180 cm.
Steam is supplied to the room so that it does not burn the feet of visitors. The steam line exits at a height of 20–30 cm from the floor level.
The ceiling is most often made arched. There is no need to make cornices, because after filling the building with steam, the walls will be covered with a dense layer of condensate. And cornices are usually used only to hide the illumination of the dome.
Video: secrets of the design of all systems of a small hammam equipped inside a wooden house
Room requirements
When planning, it is important to consider the following:
- the floor, ceiling and walls must be durable for cladding with natural minerals or stone ceramic tiles;
- a Turkish bath must consist of at least 4 rooms: steam room, technical area, shower and relaxation room;
- minimum ceiling height - 2.5 m;
- The room will need to be equipped with sewerage and ventilation systems.
When a hammam is built in a private house, the technical room is moved outside it by a maximum of 15 m. And a room not adjacent to the steam room is used as a recreation room. It is recommended to build a Turkish bath from bricks or blocks. If you plan to make a hammam in a wooden house, then all bases must first be treated with a special agent.
The ceiling is arched.
A dome-shaped ceiling will allow condensation to flow down the walls rather than drip onto the heads of visitors
How to crochet a round washcloth with elongated loops
The question often comes up on the Internet: “Is it possible to learn how to knit a washcloth just from a video?” Of course, even beginners can do such a task. All steps of creating an accessory are reproduced step by step on the screen. For convenience, we additionally place a pattern for knitting a washcloth.
Video lesson. We crochet a washcloth with elongated loops
Installation of flexible tiles
Flexible tiles can generally be thought of as fiberglass tiles that have been impregnated with bitumen. Its main layer is sandwiched between layers of oxidized bitumen containing polymer additives. Thanks to these layers, the material acquires strength and ductility. It gets its color from granulates of different colors that cover the top layer. They simultaneously perform a protective function, protecting the material from UV radiation and atmospheric exposure. Recently, manufacturers have been supplying the material with a bottom adhesive layer, which is most often covered with mounting film. This arrangement of the material not only simplifies its installation, but improves the quality of installation, as it increases adhesion to the base and better seals the coating.
Crochet washcloth mitten
A bath mitten is knitted similarly to a regular mitten. The only difficulty arises when creating the thumb, but it can be omitted. For work, take threads of sisal or flax, but nylon will cause excessive rigidity. To make the product attractive, use bright yarn.
- For a large palm we create a chain of 30 VPs or 20-25 for a small one.
- We continue to work with single crochets in a circle.
- Moving to a new row, knit 1 VP.
- Having reached the desired size, connect the tops with STBN.
- Fasten the thread.
- For babies, washcloths are made from flax threads in a similar way. Knitting patterns greatly simplify the work.
Video master class on crocheting mittens and washcloths
Roof ventilation equipment
Do-it-yourself soft roofing is a process that consists of several stages, the first of which is organizing a ventilation system. An unventilated roof is a direct path to the rapid destruction of rafters due to rot, as well as the transformation of condensation accumulating on the roof into ice and icicles at sub-zero temperatures.
This is what the soft roof ventilation diagram looks like
Ventilation outlets and vents located under the eaves, as well as the gap between the base of the soft roof and the tiles themselves - all this ensures air circulation in the under-roof space, and therefore timely removal of vapors.
Useful video on the topic - ventilation of soft roofs in the ridge area:
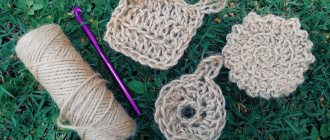
Multi-colored propylene washcloths
It is no secret that knitting, in addition to perseverance and desire, requires certain skills from the craftswoman. We look for them in books or find them on the pages of magazines. Today, it is enough to open the Internet, ask a question in a search engine, and the required answer will appear on the monitor screen. Even if a crochet hook has just appeared in your life, with the help of the “DIY” resource you will quickly master the technique of knitting a multi-colored washcloth.
Useful tips
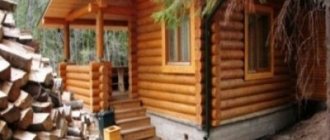
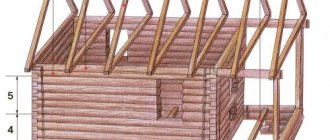
In order for the bathhouse to be in working order for a long time, you need to know the subtleties when building a structure:
- Logs for the log house are harvested in winter. This is necessary because during winter harvesting the log undergoes less rotting and is resistant to various precipitation. To check whether the logs were harvested in winter, iodine is dripped onto them. A bluish spot should form.
- To ensure that the building lasts as long as possible, all wooden structural elements are treated with an antiseptic.
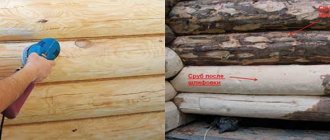
- To increase the thermal capacity of the structure and give it a beautiful appearance, it is necessary to fill all joints and gaps with tow. It should not protrude further than the logs, otherwise it will get wet and rot.
- If you choose the “foot-to-foot” method of fastening logs, it is necessary to protect the corner joints. To do this, they are sheathed with boards.
- It should be remembered that during shrinkage, the height of the building will decrease by 5 or 10 percent.
- Cutting the material to the center will help prevent cracks from appearing in the log.
- Caulk work is carried out in dry weather.
- They increase the stability of the structure and prevent the displacement of logs by securing them with dowels, installed in holes in the center of the logs.
Thus, making a log house with your own hands, although a complex process, is doable. In the video presented for this article you can find complete information on this topic.
How to crochet a washcloth for washing dishes?
Every housewife knows how often she has to change her kitchen sponge. Why not knit it yourself? Only 20 g of synthetic yarn will be needed to create such an item. When knitting, you can combine the colors of the threads.
Option 1:
- Using hook No. 5 we create 50 VP.
- We knit 4 rows (knit and purl) STBN. The tape comes out wide.
- Then we fold the fabric so that the smaller edge overlaps the larger one.
- We put the long end under the ring and weave the entire ribbon in a circle.
- We sew the edges.
2nd option:
- Having collected 20 VPs from a synthetic thread, we connect them into a circle.
- Let's make 10 rows STBN. We will hide a piece of foam rubber inside.
- Let's add 10 more rows and finish the job.
Tool preparation
The work of creating a soft roof can be carried out by one person, however, it will, of course, be more convenient to work with an assistant. To perform installation you will need to prepare:
- To mark, use a tape measure, coated cord for beating, and a pencil.
- To cut the material - a roofing knife and a thick board.
- For fastening - a hammer, roofing nails, a construction hair dryer (for bitumen shingles), a gas burner and a rolling roller (for rolled materials).
- For sealing - mastic, brush or roller, spatula.
How to crochet a hedgehog washcloth?
Knitting a hedgehog washcloth
Agree, every child will enjoy washing in the bathroom using a funny toy washcloth in the shape of a hedgehog. The presented master class is designed for beginner needlewomen. The entire process of creating a toy is shown step by step, and the master clearly explains each movement.
Video tutorial on knitting a hedgehog washcloth
What is a soft roof?
Soft roofing is a material consisting of a fiberglass base and rubber-bitumen impregnation, which is carried out on both sides. It is through the use of rubber bitumen that soft tiles acquire properties such as moisture resistance and tightness. A special coating is responsible for the wear resistance of this roofing material, which, moreover, prevents individual plates from sticking together during storage and transportation.
Let's watch a video about how bitumen shingles are produced at the factory:
Soft roofing can be laid with your own hands only on those pitched roofs whose slope angle exceeds 11°. The maximum roof slope level is not limited.
How to crochet a chicken washcloth step by step?
To make a chicken mitten, you need to use 2 skeins of yellow yarn, since the product is knitted with double thread. For decoration you will need some red and black material.
Chicken washcloth
- We connect a chain of 35 VPs into a circle.
- We create two rows with a double crochet (C 1/n).
- Then we knit the elongated loops on the wrong side. We wind the loose thread around the finger, insert the hook into the bottom row C 1/n, while picking up the thread from the finger, we pass the hook through the post. Throwing a thread over it, thread the yarn through 2 loops on the hook. A fluffy loop should come out.
- Then we make a row C 1/n and alternate it with extended rows.
- Having reached the thumb (9 rows), we begin decreasing: alternating 4 C1/n with 1 unknitted stitch.
- We leave the row with elongated loops unchanged.
- Next is a row of alternating 4 C1/n with 1 unknitted stitch.
- 3 rows before the end, the elongated loops are not knitted, but the decreases are not stopped. The posts close and turn the product inside out.
- The comb is formed with a red thread from the middle of the top (8-9 sc.b/n and 1 row of sc.b/n).
- The outline of the eyes is embroidered from black thread.
- For the beak, take 4 VPs and attach them to the base. The surprise for the children is ready.
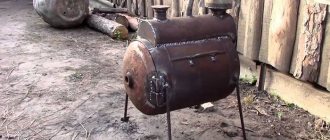
Bath equipment
Bake . Perhaps this is the most important part of the bathhouse. Stove options are varied, from complex stone and brick ones to homemade metal ones.
- The stove is installed on a foundation specially made for it.
- The distance from the stove of wooden structures must be at least 200mm. The wall in places of approach must be protected by special means, for example, a sheet of felt soaked in clay and covered with a reflective metal shield.
- The chimney is made of metal. Its passage through the ceiling and roof should only be through specially prepared openings filled with insulating materials.
The connection of metal parts of the stove and chimney to wooden structures is strictly prohibited.
- For the heater, use only stones that can withstand high temperatures with sudden changes.
Water supply in the bathhouse is carried out in two ways. The first is the connection of a water pipe from the source, and its installation into the building through the embedded casings left in the foundation. Further, it is possible to connect a shower, font, etc. In this case, hot water can be provided by connecting a special heat exchanger to the chimney. The second method is to install tanks for cold and hot water, which will be heated by the stove.
Drainage is carried out through PVC pipes installed on fittings under the bathhouse floor.
Lighting and electrical equipment. All electrical wiring in the bathhouse must be made of cable whose characteristics allow it to function at high temperatures. In addition, be sure to lay it only in a metal hose. All lighting sources must be protected by special bulbs with high-temperature and moisture-proof characteristics. Ideally, you need to install a step-down transformer at 36V.
Interesting: DIY plumbing in a private house
Features of installing soft roofing in the area of ventilation pipes and chimneys
A roofing carpet made of bituminous shingles around pipes, antennas and other utilities is laid quite easily if you mark and plan everything in advance, and also purchase special passage elements. The joints between the roof base and pipes are reinforced with the under-roofing substrate, which was already mentioned above, and then coated with mastic. The tiles are laid on top of the mastic, and then those same passage elements.
Helpful advice: to be sure, treat the joints between the passage element and the tile with sealant.
This video takes a closer look at how to bypass chimneys and other roof elements:
When the soft roofing is laid to the very top of the roof slope, use special ridge elements that cover the upper parts of both slopes, glued with mastic and nailed.
Choosing a place
It is very important to choose the right location for such a room. Regardless of whether the hammam is being built from scratch or an existing room is being adjusted to fit it, certain standards must be observed:
- the floor, walls and ceiling are prepared for subsequent cladding with ceramic tiles or natural stone;
- the room must have sewerage and ventilation systems;
- ceilings cannot be lower than 250 centimeters;
- The hammam should consist of 4 rooms - a relaxation area, a technical room, a shower and a steam room.
If you want to make a hammam at home, then it would be right to move the technical room further away. And for a relaxation room you can take any room in the apartment. If the hammam is being built from scratch, it would be better to use cinder block or brick.
Special shape and ceiling height
It is no coincidence that Turkish baths are made dome-shaped - due to the low temperature, condensation inevitably appears on the ceiling, which rolls down the walls without disturbing the people in the steam room. You can do it yourself, but you will have to work hard.
If the ceiling is standard, then moisture will continuously drip directly onto the heads of vacationers.
The issue of ceiling height also deserves attention. Unlike a Russian bath, in a Turkish bath it must be at least 2.5 meters.
A little history
Hamams are the name given to public steam baths that originated in Turkey, from there spreading to other countries of the East, and then throughout the world.
The name comes from Arabic - “hot”. Just as the Romans at one time built luxurious baths on the site of ancient temples, so the Turks, after the conquest of Byzantium, began to build their own structures, dismantling the majestic ancient Roman buildings piece by piece.
Initially, the main function of Turkish baths was a ritual of purification before visiting the mosque. Later, like in European public baths, they began to practice the treatment of diseases.
According to Islam, every believer must observe the seven commandments of purity. Until recently, it was impossible to imagine the life of a righteous Muslim without baths.
Features of using the hammam
- After completing all the work, you need to let your hammam stand for a couple of weeks, slightly maintaining the heating of the surfaces. This is done to ensure that all solutions and adhesives dry completely.
- The first start-up should be long and gradual, with a slow increase in heating temperature. This is done to prevent thermal expansion from causing the surfaces to crack. This is especially dangerous for all-stone and all-marble surfaces.
- During short breaks in the hammam operation, all heating should not be turned off. If the break is expected to be long, you need to leave the heating on the benches and massage table.
- It is necessary to keep the hammam clean and frequently clean it with special detergents for marble, tiles, and glass.
- If the water is hard, you need to remove scale from the steam generator tank on heating elements using a solvent according to the instructions, depending on the hardness at certain intervals: the harder the water, the more often. In addition, the steam generator must self-clean every few hours: drain water from the tank and add new water.
- During steaming, the ventilation hole should be kept slightly open, since the air exchange you need is equal to 4-6 volumes of your hammam per hour.
If you follow these simple rules, your hammam will serve you for a long time and will not cause any problems.