Arranging a ceiling in a house under construction does not pose a particular problem if a team of several people is working, or if there is at least one assistant available. How to make a board ceiling on your own, without anyone’s help? At first glance, it’s not easy, but it’s quite possible to put boards on the ceiling beams, even if we’re talking about a six-meter tall lumber. Building even the simplest house is never simple or easy, so you have to adapt.
Cons of wooden ceilings
Along with its advantages, like any building material, a wooden ceiling also has its disadvantages:
- Wooden structures are not resistant to humid climatic conditions; when exposed to moisture, they can become deformed and partially rot.
- If there are sudden changes in temperature, the boards will lose their original appearance and also become deformed.
- In rooms decorated with wood, it is strictly forbidden to use cleaning agents and detergents, as they contain chemicals.
- Finishing the ceiling with wooden material is considered an expensive pleasure, and therefore for people with little income this option may not be available.
- Deformation is possible after several years due to changes in temperature, poor processing, high humidity, all this can lead to discoloration and the appearance of various types of beetles.
There is one more nuance - the ability to select materials. When you buy boards, you need to consider what part of the tree the material is made from. If the board is cut from the core of the trunk, it will soon crack, but if it is cut from the edge, it will serve for a long time.
Tool for processing boards: a - erunok; b - dovetail tenon template; c — hacksaw for longitudinal sawing; g - axing saw; d - jigsaw; e — set of drills for wood: 1. Center drill with a flat head (“perka”); 2. Screw; 3. Spiral; 4. Cork; 5. Countersinking.
When choosing a ready-made board for landscaping a room with high humidity, it is better to purchase panels that have already been treated with a waterproof special agent on all sides, including the grooves. And during installation, you need to leave small gaps between the panels for ventilation.
Related article: Structure of jute-based carpet
For interior decoration, wooden finishing material made from pine is in great demand, since this type of wood is light and durable and can be finished without any problems.
To cover the ceiling with wood, various elements are used, such as edged boards, lining and, in rare cases, slabs.
What is important to consider
In addition to all the advantages that such a finish has, there are a small number of features that should definitely be taken into account when choosing the design of wood floors:
- The cost of finishing can vary greatly, depending on the type of wood chosen and the type of parts used. The most affordable option would be lining, and planks made from expensive wood species can be very expensive. At the same time, the lining may have a different profile, which affects the appearance of the assembled covering.
- Wood is sensitive to temperature changes and high humidity. Due to changes in temperature conditions, parts may dry out and cracks will appear on the coating, and when exposed to moisture, the material may begin to rot. Therefore, it is always necessary to treat the slats with special impregnations that prevent rotting and mold.
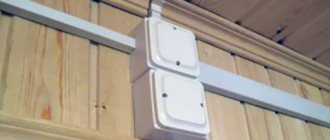
- Before finishing, you should worry about fire safety - wood is a very flammable material and all wires, as well as places where the ceiling will come into contact with heating surfaces, must be carefully insulated.
- In most cases, the installation of a wooden structure is carried out on a lathing or frame. Therefore, the height of the room will inevitably decrease. If your room cannot boast ceilings located more than two and a half meters from the floor, it is better to choose another finishing option.
- When decorating floors with ordinary boards, you need to be aware that cracks will still appear and they will have to be sealed with something. It is better to give preference to tongue-and-groove boards or linings connected using the tongue-and-groove method. When the planks diverge, the gaps will not be too noticeable.
Otherwise, wood will be a very beautiful and functional material for decorating floors.
How to cover the ceiling in a wooden house to make it look beautiful
Finishing the ceiling in a wooden house is one of the most important stages of repair work, on which both the appearance and its operational properties depend. Therefore, you need to carefully consider this issue.
Material selection
The materials used in traditional finishing of concrete (or other) ceilings simply cannot be applied to wood. At least most of them. The reason for this is the very material from which the house is built.
What solutions can you use?
- Drywall.
- Stretch ceiling.
- Plastic panels.
- MDF panels.
- Wood finishing.
Working with drywall is only possible if the walls are completely closed and there are no visible signs of wood. In other cases, from a design point of view, such material cannot be used.
Stretch ceilings require prior approval. When deciding to use such a solution, it is better to invite a specialist who can choose the option that will harmoniously fit into the overall design of the room. A careless choice can become either a distinctive feature of the room or a complete failure.
The use of plastic panels is advisable when expensive finishing materials are used. Ideally, the surface of the future ceiling will imitate the structure of wood. Cheap plastic should be excluded from the list of options without hesitation.
MDF is one of the best options. Finishing the ceiling with such panels requires high-quality waterproofing. Its absence as such will lead to the surface quickly losing its presentable appearance and requiring immediate replacement.
Wood paneling is a 100% successful solution. As a result, the coating will be in perfect harmony with the overall appearance of the room, and there are simply no obvious disadvantages in such an implementation. Next, we invite you to familiarize yourself with this option in more detail.
Benefits of using wood for ceiling cladding
Typically, clapboard boards are used, which have the following advantages:
- Thanks to treatment with modern impregnations, the service life of wood is significantly extended. Therefore, the coating will not have to be changed frequently.
- Ecology. In the era of polymers, wood is still relevant.
- Good heat and sound insulation. The inside of the house will always be warm and cozy.
- Quick installation of sheathing. Before starting work, there is no need to plaster or level the attic floor. All repairs happen much faster.
- Nice appearance. Most likely, everyone will agree that a wooden ceiling in a house made of the same material is the best solution.
A few words about the shortcomings
Any material has its disadvantages, and lining has them too:
- High fire danger. True, in a wooden house this does not play a significant role.
- Before covering the panels, they must be treated with a fire retardant compound.
- In addition, the lining must be protected from fungus and insects with special means.
- Wood does not cope well with changes in humidity and temperature.
Types of materials
The lining is made from the following types of wood:
These are the main types of materials that are advisable to use in ceiling cladding.
Pine lining is a budget option that does not require large financial investments. Good texture and color. If the temperature in the room often rises, a large amount of resinous substances are released from the panels. The most popular option used in wooden houses.
Linden lining differs from pine only in that it does not emit any substances at high temperatures. Otherwise, this is a similar option.
Oak lining is an expensive solution, which is often used in luxury cottages. There is no point in talking about advantages and disadvantages - an oak is an oak.
How to calculate the amount of material
Due to the high cost of lining, unlike other types of finishing materials, it is not worth buying it in excess. Therefore, before purchasing, it is advisable to make a small calculation.
Keep in mind that the board is sold in the form of plates of a fixed size (quite long). For a room measuring 2.4x3m, it is enough to purchase 6-meter pallets, then cut them in half and make a ceiling with minimal waste. The best solution for support beams would be pine measuring 20x20 or 30x30 mm.
Thus, using the information we provide about materials for finishing the ceiling in a wooden house, you can easily realize your ideas with minimal risks.
https://youtube.com/watch?v=a66-4m20BRA
Ceiling insulation
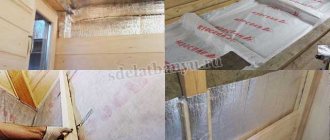
In cases where the ceiling trim of a house is placed under the rafter structure, the main floor is often additionally insulated. Until recently, the main thermal insulation materials in such cases were polystyrene foam, mineral wool and glass wool. However, life does not stand still, and the developers have released a new line of higher quality and easier to install materials.
Here are some of them:
- Basalt wool
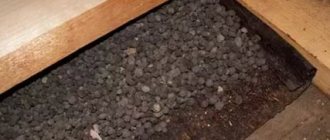
. The material is sold in tile form: the slabs can be cut to size when laying. There is also foil material made from basalt wool, which is sold in rolls. Thanks to the foil, the insulation receives reliable protection from moisture. However, this does not mean that, once installed on the ceiling, the thermal insulation will cope with flooding from above. Therefore, before starting finishing, it is necessary to carefully check the ceiling for cracks and leaks. - Penoizol
. This is the name given to urea-formaldehyde foam, which is based on foamed resin. Foaming is achieved inside special devices. After this, the suspended mixture is pumped into the void between the rough ceiling and the decorative surface. To keep the hardening insulation in place, an internal mounting frame is made of durable plastic or other material. Urea-formaldehyde foam in a foamy state fills all the voids and cracks between the individual insulation boards. The result is a completely sealed surface with excellent thermal insulation characteristics.
Pros and cons of plank ceilings
Ceilings made of boards are usually installed in those houses where natural wood is used as the main finishing material. This design has undeniable advantages, but it also has disadvantages. You can compare them in the table below:
| № | pros | Minuses |
| 1 | The design is strong and durable: properly processed wood can last for decades without losing its appearance. | The coating turns out to be quite “capricious”, because the condition of the ceiling directly depends on the microclimate in the room. High humidity or too dry air, as well as frequent temperature changes, cause the structure to lose both strength and attractive appearance due to deformation. |
| 2 | A sufficiently thick layer of sheathing itself provides good heat and sound insulation. In addition, before covering the ceiling with boards, insulation is usually installed on it, which also has a positive effect on the microclimate in the room. | Wood is quite difficult to clean because it does not tolerate contact with aggressive detergents. And you shouldn’t forget about preventive treatment against fungi and insects, which also involves certain expenses. |
| 3 | The aesthetic advantages of this solution are obvious: the lining, the tongue-and-groove board for the ceiling, and special panels look quite attractive. In addition, wood can be easily painted and varnished, so the field for design experiments is truly enormous. | The price of such finishing cannot be low, especially if you use high-quality raw materials. |
With a responsible approach, the ceiling turns out to be reliable and attractive
As for installation, it is difficult to clearly classify it as an advantage or disadvantage. Yes, this process is quite troublesome, but with minimal skill and thoughtful study of the algorithm, you can easily cope with this task yourself, without involving third-party experts.
Work methodology
The groove of the first board is cut out using a circular saw. In order for the cut to be accurate, work must be carried out from the bottom of the board. The blade should be installed deeper than the width of the board by 1.25 cm. The first board is pressed quite tightly against the wall. Then it is moved back 2 mm to create a gap for the expansion of the wood.
Near the wall, drive a nail into the surface of the board. On the opposite side, a nail is driven into the tongue and groove. When building a board ceiling with your own hands, you must measure the distance from the end of the tongue of the last board to the wall. This will ensure that the boards are parallel. These measurements should be taken at a minimum of three locations. The butt joints between the boards are located under the rafters or beams. Holes are pre-drilled into the boards to prevent the material from splitting when nails are driven into it.
↑ Using plywood as a base
Only waterproof plywood with a thickness of 18 mm or more is used as the base. Laying takes place using the following technology:
Sanding plywood is an essential element of high-quality installation of floorboards
- Plywood is cut into strips about 50 cm wide.
- The strips are mounted on the concrete screed diagonally to the location of the floorboards using screws. It is permissible to use adhesives to fix the strips.
- The plywood is sanded.
- Be sure to clean it from dust.
- The floorboard is being installed.
If the house is being renovated, then sometimes there is no need to carry out such large-scale repairs. Laying floorboards over an existing wooden floor is also one of the most common installation methods.
? Laying over old floors
The first thing you should make sure of before starting work is whether the old floor can continue to withstand heavy loads. If there are no doubts, then you can move on to the repair measures themselves. The sequence is as follows:
- Roughly sand the old flooring and remove any accumulated dust.
- Install waterproofing.
- Lay new floorboards perpendicular or diagonal to the old ones.
Installation of solid boards over existing wood flooring
If you don’t want to experiment with a new laying direction, then use plywood as a base for the new floor. By choosing sheets with a thickness of 12 mm or more and roughly sanding the plywood surface, you can install the floorboard in the usual direction.
Important! If the strength of the old floor is still in doubt, then it is recommended to carry out complete dismantling and start work from the concrete screed. It is not advisable to carry out any construction work yourself
Even the simplest activities require certain knowledge and professional training. The work of the construction team is a guarantee of high quality and excellent results
It is not advisable to carry out any construction work yourself. Even the simplest activities require certain knowledge and professional training. The work of the construction team is a guarantee of high quality and excellent results.
Modern trends, including interior design, force us to look for new solutions. For example, in the arrangement of the ceiling. Suspended and tensioned structures made of plasterboard and PVC are already considered traditional. I want something new, extraordinary. Why not then put a floor covering on the ceiling? For example, a parquet board. After all, who said that this cannot be done?
Basic techniques for lining a ceiling with boards
In fact, the decision about which ceiling boards will be used is made by the customer; it all depends on the financial capabilities and desires of the manager. The three most common filing options are most often used:
- Ceilings made of edged boards are the most expensive and high-quality method of arranging ceiling flooring. The surface of the padding turns out to be quite flat, like a table, which makes it possible, after laying the vapor barrier, to sheathe the ceiling with any lath, MDF board or plasterboard sheets;
- Rough floorings made from unedged sawn logs are stuffed only as a sublayer for further finishing. A ceiling made from unedged boards costs half as much as sheathing made from graded material, but unplaned lumber always has to be additionally hemmed with plywood or cardboard to eliminate cracks;
- Stacked ceilings made from “shorts” - scraps of boards left after laying sheathing or other roof parts.
Lining the ceiling with scraps makes it possible to significantly save on lumber. This option is suitable for any ceiling structures; moreover, for the ceiling you can use lumber of any thickness, preferably at least one inch.
Finish coating
Next everything will be very simple. From one of the corners of the room, the prepared base is covered with wooden slats, planks or clapboard. All of them are mounted in approximately the same way - either nailed through with galvanized nails, or secured using clamps. The latter can be used to fasten the lining, but for boards it is better to use screws or nails, since the load in this case is higher due to the greater weight of the parts.
You will need to leave small gaps of one to two centimeters between the walls and the coating. They are necessary to compensate for possible deformations of the coating when changing temperature conditions. After completing the assembly of the covering, all these cracks will be closed with ceiling skirting boards and will not spoil the overall appearance of the ceiling. If necessary, the entire assembled structure is varnished or painted again and your ceiling is ready.
Material selection
Blanks for rough flooring
When deciding how cheap it is to sheathe a plank ceiling, you should consider all available materials.
And first of all, slabs and unedged boards will come into our field of vision - these budget materials are widely used for arranging floors, which will then be hidden under the finishing:
Using unedged boards as flooring
- Rough filing of the ceiling with boards is carried out if we need to lay the foundation for installing insulation or a suspended structure.
- For work we use either a slab or an unedged board of a suitable size. The thickness of the parts should be at least 25-30 mm.
- To ensure that the unedged board ceiling is sufficiently reliable, we remove the bark from all pieces, and then saturate the parts with wood antiseptics.
Low-grade edged boards can also be used for this purpose, but in this case it is important to carefully sort the workpieces, removing parts with cracks and other large defects
Lining
In the minds of most craftsmen, the ideal board for the ceiling in a wooden house is lining.
And there really is a rational grain in this:
Lining fixed on beams
- The material costs relatively little, and you can find it almost everywhere.
- The technology for installing lining has been proven, so almost anyone can cope with the task.
- The sheathed surface turns out to be quite attractive, especially if you choose modifications with minimal chamfers.
At the same time, it should be noted that standard lining is quite narrow, so it must be installed on the ceiling in such a way that the joint lines are a visual continuation of the wall cladding. Otherwise, your eyes will ripple, because the ceiling, unlike the walls, is usually almost completely open.
tongue and groove floor board
As an alternative to lining, many craftsmen are considering floor boards.
In this case, the casing will not experience any special loads, so you can purchase the thinnest – up to 20 mm – blanks:
Tongue and groove boards are somewhat more reliable than lining
- For work, both a regular edged board and modifications with tongues are used. A tongue-and-groove ceiling board is easier to install; in addition, locks on the side edges allow you to create a more reliable connection.
- To fasten parts, it is better to use nails or screws rather than clamps. Still, long panels are quite heavy, so a margin of safety will not hurt.
- Instead of solid wood blanks, parquet boards, which are veneered multilayer products, can be used. Firstly, it looks more attractive, and secondly, it tolerates changes in temperature and humidity much better.
Parquet boards are also suitable for this purpose.
Planken
However, the board on the ceiling in the house does not have to be a material strictly for interior work.
Facade panels (the so-called planken) are also quite suitable for this purpose:
- Products of this type undergo multi-stage heat treatment, which minimizes the influence of temperature and humidity on the geometry of the cladding.
- The moisture resistance of the panels significantly expands the range of their applications: if you are thinking about how to make a ceiling in a bathhouse from boards so that it does not get wet, feel free to choose façade varieties.
Straight plank is suitable not only for facades
- The use of special protective equipment allows us to preserve the natural texture and color of natural wood, so that our ceiling will not look faded even ten years after covering.
Finally, it is worth paying attention to the installation. Straight plank attaches to any sheathing very quickly, so filing will not take much time
The classic version of the ceiling padding
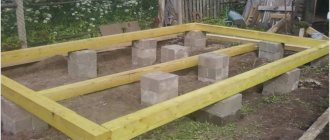
The general rule used when planning to pad a ceiling with a board is as follows: to securely fix lumber, no matter whether it is edged or unedged, it is necessary that the board screwed to the beams touches the walls with its edges. A small shelf, 2.5-3 cm wide, on the top row of brickwork is left at the stage of laying the mauerlat. It is clear that there must be shelves on at least three walls, two of which are supporting for the ceiling beams, and one is the starting one.
In this case, filling the board is not particularly difficult:
- We measure the distance between the walls from shelf to shelf;
- We cut the required amount of lumber in one bag;
- We lay the boards on the shelves and fasten them with self-tapping screws and a screwdriver.
Before attaching the ceiling boards, they must be aligned with the starting strip, beaten with a carpenter's hammer, and only then the fasteners must be installed.
Important! For each saw log or plank of rough sheathing, at least two self-tapping screws are used on each side.
In this case, the fasteners must be oblique, that is, each subsequent screw is placed with a slight offset to the left or right, so that there is no one line weakening the floor beams.
In the final version, the rough ceiling can be covered with clapboard or sheets. The tongue-and-groove board or lining is cut into blanks of the same length and holes for the screws are immediately drilled. Screw the fasteners into the holes, and you can fasten the lining to the rough ceiling using a screwdriver. The location of the drilling points does not matter. In this case, the clapboard cladding is supported on a wooden panel made from rough sawn logs, and it does not matter where the screws on the ceiling are screwed.
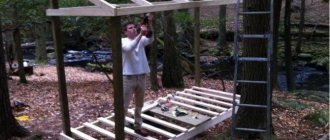
How to sew long boards onto the ceiling of a wooden house alone
The situation is more complicated when in a wooden house you have to cover the ceiling beams with boards of six meters or more. The lack of shelves on the walls and assistants who could hold the material on the ceiling seriously complicates the work.
But, nevertheless, you can make padding with an inch board alone. To do this, you will need to make a T-shaped support from the same board that is used for the sheathing. The height of the device should be 5 cm less than the distance from floor to ceiling.
The system works this way. A six-meter board is placed at one end in the joint between the ceiling and the wall. Next, the saw log is lifted and supported using a T-support at a distance of two meters from the wall. This is enough to install two lines of fasteners. By rearranging the support every one and a half meters, you can fix the board to the ceiling without much difficulty.
If a house or building consists of several rooms separated by partitions, then the laying of the lining material must be carried out simultaneously with the installation of the ceiling beams. In this case, it will be necessary to temporarily remove the Mauerlat from one of the side walls in order to pull the lumber into the gap between the partitions and beams. Fixing lumber on the ceiling is carried out in the same way as in the previous case.
As a rule, the length of six-meter boards is not enough to cover the ceiling from wall to wall with one thread. To ensure that the joint between two lumber does not miss the beam and hang in the air, it is necessary to mark the distance between the ceiling beams so that the seam between the ends necessarily falls on the line of laying the beam.
Rough finishing of the ceiling with scraps - “short ones”
The standard distance between ceiling beams is 60-70 cm, if a spliced beam or board is used, if necessary, the step can be reduced to 50 cm. This allows you to make a rough ceiling from a regular cutting board, and it doesn’t matter how thick it is, the main thing is that its length is greater distance between lags. In this case, the remaining pieces of edged lumber are used; unedged material is practically not used for this ceiling lining scheme.
The existing stock of scraps must be carefully sorted and rejected for the presence of defects and knots in the wood. The pieces of material are short and are attached to the ceiling at only two points, so only whole pieces are used.
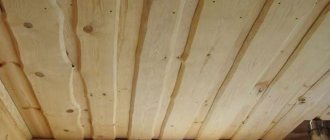
Lining the ceiling with boards is carried out in three stages. Initially, one regular inch is sewn onto the lower plane of the ceiling beams along the axis. The result is an inverted T-shaped structure with two supporting shelves, on which the cut blanks – “shorts” – are placed.
At the next stage, each workpiece is knocked down with gentle blows to the side and secured with a stapler or self-tapping screw. Since the distance between the support points is almost two times smaller, the strength and rigidity of the rough planking is much higher than in the case of using the classical scheme. The appearance of the rough ceiling turns out to be quite unusual, but no less interesting than the texture of the cladding made of solid lining.
At the third stage, the laid trimmings must be fixed on the beams from the attic side. To do this, you can sew the side slats in a similar way, or do it easier - blow out the joints with foam. Foamed polyurethane seals all the cracks between the boards well, so steam will not rise through the joints or crumbs of insulation will fall out. Details of working with the ceiling are shown in the video.
How to make a tongue and groove board with your own hands
Another important advantage of tongue and groove is the ability to make it yourself if you have certain woodworking skills. This painstaking work requires free time and knowledge of the intricacies of technology, as well as the rules for choosing quality raw materials. Based on the appearance and condition of the material, the board is divided into the following grades:
- extra - the most expensive grade, there are no knots or defects on its surface, it has an absolutely smooth, uniform structure;
- A is a high-class grade, but small spots and darkening are allowed on its surface without the presence of knots or other defects in the wood structure;
- B is the most popular variety in the mid-price category. Knots and other inclusions and stains on its surface do not spoil the overall appearance, but create an additional decorative effect of naturalness;
- C is a cheap grade with acceptable various structural inhomogeneities and through knots.
The moisture content of the sheet pile can be easily determined with a moisture meter. Having decided on the grade, you should pay attention to other criteria for choosing the original lumber:
- humidity should be 10–15%, and ideally up to 8%; such indicators are achieved using industrial drying in special chambers, after which the board acquires its stable size and will no longer dry out. High-quality drying can be determined by the shiny surface and a ringing sound when tapped, and a high level of humidity is determined by the presence of condensation on the inside of the plastic packaging;
- the integrity of the packaging will allow you to maintain a low level of humidity and the quality of the raw materials; when purchasing, you should also check for certificates, receipts and other accompanying documentation; it is recommended to choose products from well-known large brands that have earned the trust of consumers; a cheap board from an unknown manufacturer may be of low quality;
- Violations of the geometry and smoothness of grinding, especially for high-end products, are unacceptable; they will complicate installation and can spoil the appearance of the finished coating. These parameters are checked visually and manually;
- When combining several different types of wood, you should select boards of the same standard size to reduce the number of trims. The type of wood depends on the purpose of the room and the planned loads and operating conditions.
Required materials and tools
The boards have been purchased, now you can start working.
For home tongue and groove you will need the following tools and materials:
- tape measure, level, ruler, square, marking pencil;
- impregnation against fire and biological damage;
- jigsaw or hacksaw for size correction;
- jointer with quarter selection function, milling machine;
- clamps for fixing the workpiece.
Step-by-step manufacturing process
Of course, it will not be possible to achieve production-grade extra-grade boards in a home workshop, but making a locking connection and subsequently getting a beautiful, flat floor without creaks and cracks is quite possible.
Stages of work to be performed:
- Before work, you should keep the purchased raw materials indoors for several hours to adapt to temperature and humidity conditions. A dry, clean board ready for processing must be secured to the work table with clamps so that it does not wobble or move during work.
- Measure along the long side the middle of the end side surface and apply markings for the locking connection.
- Using a hand jointer or a milling machine, you need to very accurately and carefully cut a quarter groove in one long end of the board.
- At the other end, you need to select quarters along the edges of the drawn axis to make a tongue and groove.
- On the back side of the board, cut gutters or grooves for ventilation; one groove is enough. If necessary, sand the front side
- Treat the finished planks with an antiseptic and anti-fire impregnation, which will extend the life of the floor and delay the need for repairs.
Video: how to make a tongue and groove board with your own hands
A tongue and groove board will last for decades if the material is chosen correctly and the tongue and groove is done slowly and carefully. After laying the floors, it is advisable to cover them with several layers of protective varnish, then they can be washed, move heavy furniture and walk on them in high heels without the risk of scratching or pushing through. Hardwoods that are resistant to mechanical stress can be coated with a special oil, which will highlight the beauty and reveal the texture of the wood.
Application of floor board
If you want to finish the ceiling with boards, you can use flooring material. This option is an original solution and involves the use of tongue and groove boards. This technology has a great advantage, because the floor boards have mounting grooves. Thanks to this, during changes in humidity and temperature, cracks and cracks will not appear at the joints. When using a tongue and groove board, you will get a smooth surface. If differences are present, they will be completely unnoticeable.
If you want to cover the ceiling with floorboards, then you should take into account some nuances. For example, you should not purchase too thick lumber for the ceiling. A thickness of 20 mm is sufficient; in some cases, the board should have smaller dimensions. As an alternative solution, you can use durable parquet boards, because such material will give the room a special atmosphere.
You can also choose parquet, this allows you to achieve original solutions. When purchasing a board, you should pay attention to the quality of processing of the building material. Wood must be protected from mold and parasites. When processing has not been carried out at the production stage, you must take care of it yourself.
Installation method
If you prefer to assemble the structure yourself, then you need to understand the sequence of work and methods of attaching the slatted covering to the floors. First, let's look at the second question: the fastening method. At this point everything is quite simple. It is necessary to assemble a sheathing from wooden blocks or slats, to which fragments of the covering will subsequently be attached.
When assembling the sheathing, you should pay special attention to the location of the lower planes of the structure at the same level. Covering boards will be hemmed to them and the horizontal level must be maintained
If necessary, thin pieces of plywood or other materials can be placed under the parts to set the desired level of arrangement of the elements.
After the sheathing is completely assembled, the tongue and groove board chosen for your ceiling will be attached to it. The general sequence of actions will be as follows:
- Preparation of the base plane - treatment with compounds that block the development of mold and fungi, cleaning it from contaminants, and so on.
- The next operation is marking. Here you need to take into account one point - it is better to place the slats to which everything will be attached at the same distance from each other, perpendicular to the direction of laying the boards.
- Next, you should prepare the coating parts themselves. They are sawed off to the required size so that a small gap remains between the wall and the edge of the plank to compensate for possible thermal expansion of the material.
- The main stage is covering the base with lining strips or other types of tongue and groove. It is better to fix the parts using thin nails driven into the groove at an angle or clamps.
When the entire plane is assembled, all that remains is to give it the desired color using paint and install decorative skirting boards that will close the gaps left along the perimeter of the plane. In addition, do not forget about the installation of lamps, which is carried out at the last stage.
Sheathing technology
Covering the ceiling with light boards is a fairly simple process. But this may take a long time. Firstly, you will have to work with your arms raised above your head. Secondly, usually the boards have a small width from 4 to 10 cm. The connections between the elements should be on beams or rafters. Their location should be marked with a chalk cord.
Finishing the ceiling
After creating the interfloor ceilings, it is necessary to make the finishing coating of the ceiling. It can be made using various materials. Each method has its own characteristics and disadvantages. When choosing, you need to consider not only cost, but also consumer qualities. There are several options for how to hem a rough ceiling.
Covering the subfloor with boardsSource cdelayremont.ru
Drywall
This ceiling is affordable and practical. The disadvantage is the vulnerability of the material to high humidity. For this reason, rough plasterboard ceilings should not be used in unheated or damp rooms.
This type of rough ceiling lining on wooden beams is usually attached to a metal base. If the wooden surface is flat, it can be secured by gluing.
PVC panels
Lining the rough ceiling with this material can be used regardless of the planned design of the room. They give the room a stylish and beautiful look, but are highly vulnerable to mechanical damage. They are attached to the base using a stapler or liquid nails are used for this.
This material for rough ceiling finishing has weak heat-shielding properties. When using it, you must ensure that there is a suitable layer of thermal insulation.
Lining
This material for lining a rough ceiling is beautiful, but its use will be more expensive than previous options. The slats can be attached with self-tapping screws directly to the base. In some cases, a frame is created to install them.
MDF panels
They are made of plastic. The appearance is made to imitate a variety of materials - it could be, for example, wood, stone or plaster. A positive feature of the material is its high resistance to moisture. Therefore, such panels are used not only in residential premises, but also in kitchens or baths.
For attachment, special fixing brackets are used - clamps. But the material itself does not provide high-quality thermal insulation.
When filing the ceiling, you need the sheets to fit tightly to each other. Source santorpack.ru
Plywood
It combines accessibility and practicality of use. This material can be used as a base for the finishing layer, as it creates a perfectly flat surface. Usually, before making a rough plywood ceiling, the material is pre-treated to increase its durability. In particular, if it has undergone moisture-proof treatment, it can be used in rooms with high humidity.
Board
This material is one of the most common. Before hemming the ceiling with a board, the material is pre-treated to increase its resistance to moisture, as well as with an antiseptic. The finishing layer is additionally installed on it. If the boards are made of coniferous wood, they cannot be used where there is strong heating, for example, in a bathhouse. This is due to the fact that under such conditions, resin may begin to release from the wood.
Installation of boards can be done closely, with a minimum gap. In this case, the coating will become a reliable basis for the finishing coating. It can withstand even heavy types, such as stucco.
It is allowed to file the rough ceiling at intervals of up to 40 cm. They can also become the basis for the finishing coating, but with less strength. This method will allow you to save a little on the purchase of materials.
Manufacturing of sheathing
Using a level, stretch the fishing line in the middle and along the edge of the ceiling. It is designed for fastening slats, the first of which is placed near the wall. The slats are placed perpendicular to the fastening of the lining. After the sheathing is installed, measure the length of the boards and cut off the excess.
- The best option for fastening the lining is self-tapping screws. In order to hide the fasteners, they are screwed into the groove. If you cannot hide the heads of the screws, you can use decorative screws; they will give the interior a unique charm.
- After the ceiling is ready, it needs to be painted or varnished. There are also special dyes that will give the ceiling a natural texture of walnut, oak or pine. The ceiling is painted, and the final touch would be to go over the surface with “zero” sandpaper to clean the surface of random fluff and bubbles.
Today, finishing made of boards has become fashionable and unique in its own way, and it remains to think what other material the ceiling can be made from so that it brings only warmth and comfort to every home.
How does a board ceiling differ from other cladding options?
Some master builders do not cover the ceiling beams with a rough ceiling at all, lay down plasterboard cladding or sew lining directly on the laid timber. Perhaps such savings are justified in some cases, but in practice, a ceiling made of timber and boards is much more durable and more convenient for further work.
Hemming the ceiling space to a certain extent helps solve several problems that you will definitely have to face when installing a roof frame and insulating the ceiling:
- Adding boards to the ceiling solves the problem of having a deck or deck that can be walked on unobstructed while working on the roof. You can, of course, lay temporary flooring, but from a practical point of view this is just a pointless transfer of boards, a waste of time and double work;
- Sewn-on ceiling boards noticeably increase the rigidity of the ceiling, especially in a situation where spliced boards were used as material for beams instead of full timber. The difference between a hemmed and unlined ceiling becomes obvious after the first rafters are installed.
For your information! Properly laid boards provide a reliable base for laying almost any type of ceiling insulation, from expanded clay backfill, sawdust to mineral board or EPS.
Instead of boards for lining the ceiling surface, you can use OSB boards or moisture-resistant plywood
But such a solution will cost much more than plank flooring, and in addition, walking on plywood cladding must be done with the utmost caution, since the strength of a sheet of 8 mm is noticeably lower than an inch board
Interior features with a wooden ceiling
When arranging a wooden ceiling, you need to remember a few rules that will help create a unique and harmonious interior.
- If the wooden ceiling is black or very dark, then the walls, windows and doors should be light or white. The exception is a room in which it is planned to create a dark, “severe” design.
- A dark ceiling made of wooden panels and beams can be brightened by the proper placement of lamps. Sometimes additional windows are made on the ceiling through which natural light penetrates.
- To visually lighten a wooden ceiling, use the narrowest possible false beams.
- Beams placed across the room visually make it narrower. Beams placed along a narrow room will make it appear longer.
- Vertical narrow racks along the walls, which are a continuation of the ceiling beams, will visually increase the height of the room.
Dark wooden ceiling
Vertical narrow racks along the walls, which are a continuation of the ceiling beams, will visually increase the height of the room
Basic techniques for lining a ceiling with boards
In fact, the decision about which ceiling boards will be used is made by the customer; it all depends on the financial capabilities and desires of the manager. The three most common filing options are most often used:
- Ceilings made of edged boards are the most expensive and high-quality method of arranging ceiling flooring. The surface of the padding turns out to be quite flat, like a table, which makes it possible, after laying the vapor barrier, to sheathe the ceiling with any lath, MDF board or plasterboard sheets;
- Rough floorings made from unedged sawn logs are stuffed only as a sublayer for further finishing. A ceiling made from unedged boards costs half as much as sheathing made from graded material, but unplaned lumber always has to be additionally hemmed with plywood or cardboard to eliminate cracks;
- Stacked ceilings made from “shorts” - scraps of boards left after laying sheathing or other roof parts.
Lining the ceiling with scraps makes it possible to significantly save on lumber. This option is suitable for any ceiling structures; moreover, for the ceiling you can use lumber of any thickness, preferably at least one inch.
Technology for installing ceilings on beams
If you want to figure out how to make a ceiling in a private house, the installation sequence given below will help you understand the specifics of the work.
Tools and materials for work
Before making a ceiling in a wooden house, prepare the following materials and tools:
- saw or jigsaw;
- hammer;
- stapler;
- screwdriver;
- cranial bars (used if the ceiling is hemmed above the bottom of the beams, the section of the bars is 5x5 cm);
- self-tapping screws (optimal length 4.5-5.5 cm);
- slats for making a supporting frame for sheathing made of plywood and other boards;
- material for filing;
- nails;
- building level;
- thermal insulation material;
- hydro and vapor barrier.
Laying vapor barrier
Before making the ceiling in the house, a vapor barrier membrane is laid. It is attached using a stapler to the supporting beams from the bottom.
For these purposes, the following materials are used:
- foil products;
- polypropylene films;
- reinforced polyethylene films;
- multilayer membranes.
Strips of vapor barrier material are attached with an overlap of adjacent elements to a width of 15 cm. The joints must be sealed with tape. To protect the film from damage, fixation is carried out through a strip of thick paper. The vapor barrier is installed on the walls to a height of 20-30 cm. All junction points are carefully insulated.
Laying insulation
After laying the film, insulation is laid on the back side (between the floor beams).
The following materials are used as a heat insulator:
- mineral wool;
- expanded polystyrene;
- Styrofoam;
- basalt wool;
- sawdust;
- expanded clay
Before installing the rough ceiling, only lightweight materials (construction wool, polystyrene foam and expanded polystyrene) can be laid on the vapor barrier membrane. Bulk insulation is poured into the gap between the beams after installing the rough ceiling.
Installation of a rough ceiling
When making a ceiling with your own hands in a private house, do not forget to mount the rough ceiling surface. It will be the basis for the finishing layer. In some cases, the rough base is used without finishing as a finishing coat.
Installation of the rough ceiling surface takes place in the following sequence:
- We attach a frame of wooden slats to the load-bearing beams on top of the vapor barrier layer. It will be the basis for the rough ceiling and support for the thermal insulation material, which is best laid after the frame is made. We make the lathing from slats with a cross-section of 3x4 cm. We attach the slats to the beams in increments of 50 cm. For fastening we use screws or nails. The frame will simultaneously serve as a ventilation gap between the ceiling itself and the ceiling lining.
- After this, we attach the selected material for making the rough ceiling. We attach plywood or ceiling slabs joint to joint so that the joint points fall in the middle of the sheathing strip. We attach the slabs to the frame with self-tapping screws, which we screw in at 150 mm increments.
- We periodically check the evenness of the surface using a building level.
After finishing the construction of a wooden house made of timber, you have to face this situation - you want to see a reliable rough foundation on top, instead of wooden beams, to implement the intended design, install decor and a spectacular interior. I didn’t have to hire craftsmen to file the ceiling; it was enough to follow the generally accepted rules to make the wooden ceiling with my own hands reliable for many years. Wooden beams are used mainly in private houses, while concrete floors are used in apartments. But it is quite possible to make a beam structure during a major renovation of the roof on the top floor; this is better than creating a concrete partition.
Wooden beams are mainly used in private homes
How to choose an exterior finish
Considering that the repairs are quite complex and costly in terms of money, you need to think right away about what your external ceiling decoration in a wooden house will be like.
The most democratic finishing options include ordinary plastic panels. True, visually they do not look very beautiful. Disadvantages also include limited color options, a small selection of patterns, and the fragility of the panels. All these disadvantages apply to most suspended types of panel coverings.
Laminate as a ceiling finish is quite expensive. It really looks pretty good. The advantages include a large selection of textures and colors.
Stretch ceiling. Probably one of the few materials that are not afraid of shrinkage at home. They are quite demanding regarding the presence of good ventilation of the space between the ceiling and the ceiling. They have great variability in colors and patterns.
Drywall. The most common finishing option. As a result, you will have a perfectly smooth ceiling. Ask any builder what to cover the ceiling with, and he will give you the answer - of course, plasterboard!
Designers love drywall for its versatility - it allows you to create multi-level structures. The disadvantages of such an overlap include the mandatory creation of a frame, which must hold everything on itself. Unfortunately, drywall cannot be hemmed directly to the subfloor.
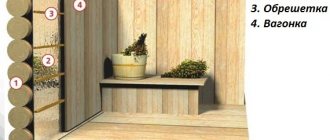
Lining. Goes well with the walls of a wooden country house. There is an opinion that lining is used only for cladding balconies or bathhouses. This is a misconception.
The most important thing is to choose the lining of the correct design and do not forget to treat it at the end with a finishing coating (stain and varnish or paint). This way the tree will not lose its appearance over time. This ceiling looks good if you have a country or Provence design in your home.
MDF panels. They have a good appearance, but are very demanding on good waterproofing. If you have high humidity in your room, you should not make a ceiling using MDF panels. Their cost is low.
Gluing sheets
Frame mounting options are more common.
Creation of a wooden frame. To do this, you need to do the following:
- visually determine the lowest point of the ceiling;
- We mark the future frame on it. To do this, you need to retreat 5 cm and draw a straight horizontal line. If the drawing is done correctly, the starting and ending points will be on the same level;
- along this line we install a wooden batten;
- We fasten the rail using self-tapping screws;
- after that we install the base bars. The pitch should be chosen so that the structure is reliable and strong;
Note! The pitch for parallel bars must be at least 0.8 meters. If the structure is small, then the step can be about 0.5 meters
- We attach load-bearing strips to these beams;
- We also fasten the bars with self-tapping screws. The attachment points should not be on the same straight line. It is best to use a checkerboard order.
Which board to choose
Quite often, consumers wonder what ceiling tiles to use. The most popular today are tongue-and-groove panels and cladding, the latter is also called eurolining. Regular lining is dense and has relatively little texture. Its surface can be painted to create an interesting striped effect. The material will have a different shade.
What are the benefits of this coating?
Wood is a very flexible and versatile material. You can make a lot of different things from it, including covering the ceiling surface. But, in addition to beauty, this design has a number of advantages:
- Behind the canvas of such a ceiling you can hide all communications and wiring.
- Installation is simple, which means you can do it yourself.
- If you get tired of the appearance of the coating, you can always repaint it.
- The atmosphere in the room where such ceilings are installed improves.
- Wooden surfaces serve as additional heat and sound insulation.
- The material is not harmful to health at all.
If you do all the installation work yourself, then the total costs of creating such a ceiling will not be so huge.
Modern lumber for ceilings - planken
One of the latest innovative solutions to emerge in the field of production of materials for flooring design is planken. The products go on sale completely ready for use.
During the production process, planken is subjected to drying, heat treatment and hardening. Thanks to heat treatment, which occurs under the influence of high temperatures, wood has special technological characteristics. Purchasing planken is one of the best choices of lumber for finishing ceilings.
This is evidenced by its undeniable advantages:
- increased strength;
- high degree of resistance to the negative influence of all kinds of microorganisms;
- the material is not dangerous from moisture;
- long service life;
- excellent wear resistance, thanks to which the ceiling will look like new throughout its entire life;
- presentable appearance - planken will decorate any interior;
- resistance to sudden temperature changes.
We can conclude that using boards to decorate the ceiling surface will be an excellent solution for every property owner. Therefore, this type of lumber is often purchased for the purpose of cladding the surfaces of saunas, baths and similar objects.