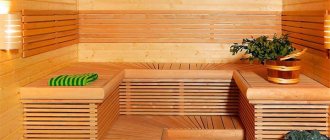
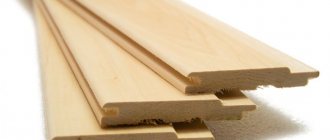
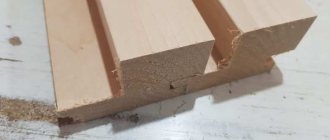
Lining differs from ordinary edged boards in the presence of longitudinal grooves. They provide a tight connection between the elements. The surface after finishing is smooth, without gaps and neat in appearance.
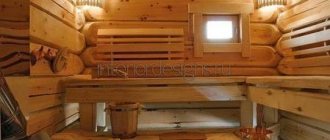
This is why lining a bathhouse with clapboard is becoming so popular. Wood material allows you to create a microclimate favorable for relaxation in the room. The installation process is simple and easy to learn on your own.
Users often search for:
- Bath shelves
- DIY bath floor
What type of wood to choose for finishing a bath
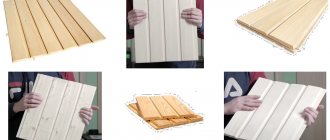
Regular and eurolining are available for sale. The first one has a rough surface, the second one is completely smooth.
Finishers recommend using eurolining for bath lining, since the raw material has holes for ventilation, which prevents condensation from accumulating inside the material. It is made from premium quality wood and lasts many times longer.
Among the advantages of using eurolining in a bathhouse:
- Large and convenient dimensions of the groove and ridge (length can reach 8 mm).
- The presence of compensation slots ensures good ventilation of the planks and prevents the formation of cracks on the surface.
- The raw materials are already covered with a protective layer of antiseptics, which are used in rooms with high humidity and do not contain toxic substances.
The correct type of wood is also important. The list of recommended species is different for interior and exterior decoration.
Inside (dressing room, steam room)
For a steam room, it is permissible to use only hardwood with increased resistance to moisture. There should be no knots or other defects on the surface. Grade - first or highest.
You can line the steam room with clapboard from:
- aspen;
- linden;
- alders;
- oak;
- Abasha.
Coniferous species in the steam room can be used cedar, larch, hemlock. When heated, they do not release resin.
It is better to use inexpensive pine for lining the dressing room. It is not used in a steam room due to the release of resin, which sticks to clothes, and when heated, it can cause a burn.
Let's look at the properties of wood species that are suitable for finishing baths.
Alder
Hygroscopic. It has low thermal conductivity. Has a pleasant aroma. Has a beneficial effect on health.
Often used to decorate the interiors of country houses and closed gazebos. The downside is the high price. Sold in pieces up to 3 meters long.
Oak
Expensive raw materials, which is why it is not so popular. Difficult to sand or trim. But rot does not form on it. Durable. Oak lining does not require additional processing before installation.
Aspen
Color – white with a silver tint. Tree rings are visible on the surface. Light in weight. Tolerates temperature changes and high humidity well. Thermal conductivity is low. The raw material is soft. Convenient to process.
Over time, aspen lining becomes even stronger.
For periodic maintenance, when the color of the surface becomes dull, it is enough to sand it.
Linden
Many dacha owners prefer to decorate their bathhouses with linden clapboards. This is due to its beneficial properties, beautiful appearance of the material and ease of processing.
Found in light colors with a brownish or reddish tint. It has a matte shine and low thermal conductivity.
When used in a steam room, it releases beneficial microparticles. At the same time, the wood is durable and does not dry out over time.
The only caveat is that contact with iron leads to its oxidation and the formation of rust.
Abashi
This is the name of African oak. Its height in the natural environment is up to 40 m, width – 3 m.
In section, the color of the array is light yellow, cream. Abash has low thermal conductivity. The raw materials are durable. The structure is dense. Does not deform under the influence of external factors. Easy to process.
It will take a lot of money to sheathe the inside of a Russian bathhouse with abash, but such a coating will last for decades without requiring additional processing or maintenance.
Lining is not available for sale in every hardware store.
The same situation applies to ash lining - it is rare and the price is high.
Disadvantages of hardwood upholstery - the color fades over time, you have to periodically coat the surface with an antiseptic.
Coniferous raw materials are rarely used in the steam room. Since most of them, when heated, release resin. But these rocks are great for finishing walls, ceilings in washrooms and dressing rooms.
Conifers are inexpensive, easy to process, and have a pleasant pine aroma.
Let's look at the properties of the most popular of them.
Cedar
It comes in a variety of colors due to its wide range of growing locations. Available in beige to coffee shades. Durable. Resistant to differences in temperature and humidity. Requires mandatory treatment with antiseptics. The price is high.
The disadvantage of cedar lining is that it can begin to release resin after several years of use, without even heating up.
Larch
Demanded coniferous species.
Many builders line the steam room with hardwood clapboard. It can be used to cover the ceiling, walls, and in the shower, locker room, and rest room.
Does not release resin. Durable. Withstands temperature changes. Doesn't rot. Not susceptible to damage by insects.
When exposed to moisture it only becomes stronger. The structure of the wood is homogeneous. The fumes from larch have antiseptic properties.
Pine
Used for finishing work in the dressing room, locker room, and rest room. The surface of the lining is smooth. It comes in beige, brown colors with a slightly reddish tint. The structure of the growth rings is clearly defined. Resin channels are noticeable. Excellent resistance to mechanical stress. Convenient to process.
Pine is not used for lining the steam room. But if the owners do not have another lining at their disposal, then before using the steam room they will have to heat it several times to remove any escaping resin.
You only need to purchase top-class lining.
Hemlock
Coniferous species from the pine family. The tree is also called Canadian hemlock. Unlike pine, it is very durable and is not afraid of high humidity or sudden temperature changes. Therefore, hemlock clapboard is used to cover the shelves, ceiling, and walls in the steam room.
Does not rot or deform. Thermal conductivity is low. When heated, it releases essential oils that are beneficial to health.
Despite the advantages of coniferous trees, most owners prefer deciduous linden or aspen. A pleasant aroma, low thermal conductivity, and ease of processing make them popular in the decoration of baths and other premises.
Outside
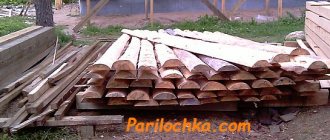
For cladding the outer part of the structure, moisture-resistant larch, sometimes oak, abashi, and premium pine are purchased.
The most popular type of profile is the block house, which imitates a rounded log. In this case, the tongue-and-groove connection is preserved. The front side is round, the inner side is flat or with ventilation ducts.
Among the nuances of external fasteners:
- Openings for windows and doors are decorated with a profile (beam).
- Only the highest grade lining is used, without knots or other defects.
- Two posts are fixed at each corner.
- The fastening method is through.
- The parts are mounted with the groove down to prevent precipitation from getting inside.
An alternative to wood lining is plastic. It is resistant to any weather conditions and has a wide selection of colors, including wood imitation. The downside is that the plastic is fragile, so installation is carried out carefully, otherwise the planks may crack.
Characteristics and types of lining
The lining received its name after it was first used for covering carriages. Boards with tongue-and-groove joints along the long sides of the profile ensure strong contact between the panels, forming an even, smooth surface without gaps. Cladding interior walls from any material, such as brick, allows you to create an aesthetic design. You can install it yourself.
The lining is produced in plastic and wood. Lightweight plastic is cheaper, but it is not suitable for use in the hot conditions of a steam room, so wooden lining made of pine and hardwood is used for cladding. It is made from wood waste or solid wood.
If necessary, plastic or metal (panels) can be fixed in the dressing room, protecting the lower sections of the walls at the entrance from dirt. In the shower, tiles or artificial stones laid over the entire height of the wall are suitable for cladding.
The choice of natural material is due to its quality characteristics:
- beautiful appearance and natural shade;
- wide range of applications (suitable for finishing individual areas - ceiling space, metal doors, structures are sheathed with panels, and vice versa, walls can be completely covered with clapboard);
- high thermal insulation of the coating;
- durability (does not rot in a damp room, lasts for decades);
- not difficult to install;
- beneficial features;
- affordable price;
- easy care of the front surface of the product.
There are two main types of lining on sale: classic - slightly rough, small width up to 12 cm and length up to 80 cm, suitable for vertical cladding, and eurolining - absolutely smooth, 12.5 cm wide, 96 cm long. Thickness is used from 12 to 25 mm . Eurolining has pores that provide ventilation and prevent the accumulation of condensation. This makes it an ideal material for interior cladding. It is made from the highest grade of wood, which ensures a long service life.
Advantages of decorating a steam room with eurolining:
- the panels are already treated with an antiseptic composition, which ensures resistance to moisture;
- groove sizes up to 8 mm;
- the formation of cracks on the surface is excluded due to the good ventilation of the panels;
- humidity according to GOST is 12.0%.
Classic lining is produced in the following grades or classes.
| Name | Peculiarities |
| Extra | Smooth, completely free of knots, cracks, and other flaws; it is not necessary to cover it with a protective compound. |
| First grade, class A | Smooth or slightly rough. Allowed is one knot with a diameter of no more than 1.5 cm, 2 resin pockets, one linear meter, cracks no more than half the length of the panel. |
| Second grade, class B | The following defects are allowed: multiple knots, wormholes up to 3 pcs. per linear meter, through cracks up to 30 cm long and up to 1 mm wide along the entire length of the panel. Rot can be no more than one tenth of the board. This type of panels is suitable for wall cladding for painting. |
| Third grade, class C | They have numerous defects. Used for rough finishing work. |
Expert's comment: a large selection of materials makes it possible to decorate a bathhouse to your taste and taking into account your financial capabilities. With a skillful approach, even such flaws as traces of knots and uneven color of slats will help add charm to the interior. It is enough to cover the lamellas with stain, giving them a tone, they will not lose their functions.
They produce profiles of different shapes and connection types:
- Shtil standard - with channels on the reverse side to prevent condensation. Features rounded edges.
- Standard - with a tongue-and-groove connection. The short tenon compared to the groove ensures contact without deformation.
- Euro - with a slightly elongated spike. After installation, the wall has a ribbed appearance.
- Soft-line – combining the characteristics of Shtil and Euro profiles: elongated tenon, rounded edges, embossed surface.
Another variety is Block House. Thin slats with the appearance of a rounded log. Suitable for external cladding.
Ways to fasten the lining
Two types of fasteners are used for installation.
Kleimers
Safe type of installation. Doesn't damage the planks.
A clamp is a mounting bracket with 2-3 holes for self-tapping screws (nails or a construction stapler), which is placed on the lining tenon.
Having fixed the bracket on the tenon, it is attached to the sheathing beam. You need to start from the center, then move to the edges, maintaining verticality or horizontality. Claypers are used for laying lining on ceilings and walls. If necessary, it will be possible to dismantle several planks without damaging other elements of the bathhouse design.
Nails or screws
For the self-tapping screws, pre-drill a hole with a diameter slightly smaller than the size. Self-tapping screws are screwed into a tenon or groove at an angle of 45 degrees.
The nails are simply driven into the slats in the right places. To avoid rust on the surface, it is recommended to use copper or galvanized nails. But it is worth considering that they will cost twice as much as usual.
In any case, the cap will be flush with the bar. Places of fasteners are sanded and polished. There should be no burrs or defects left on the surface.
The disadvantage of through-mounting the slats is that the metal elements will gradually begin to rust, streaks will appear, or there is a risk of getting burned when heated.
Decorating a bathhouse with clapboard: stages of work (step-by-step instructions)
You should start with preparations to strengthen the base to which the frame is nailed. The preparation can be done independently: the walls are cleaned, deep cracks are sealed (spray foam will do). Attention should be paid to the space around the window.
After you have purchased the necessary material and brought it home, it must be kept indoors for several days for acclimatization. If the surface of the slats is not treated with special compounds, you need to purchase impregnations for the bath. And also prepare the necessary tools.
Covering a bathhouse with clapboard includes the following steps.
| Photo | Scope of work |
| Bars with a cross section of 50 x 50 mm are fastened in increments of 450 mm to 550 mm. The frame structure must be located perpendicular to the laying of the lamellas. The advantage of lathing is that you can hide pipes and wiring inside and install lighting. For vertical panels, the timber is installed horizontally, and vice versa. When installing, be sure to use a plumb line and level; it is better not to visually determine the position of the lamellas. The timber frame is fixed not with nails, but with self-tapping screws, which are intended for this purpose. Galvanized for finishing wooden walls, plastic for stone and brick walls. First they lath the ceiling, then the walls. |
| Carry out at the stage of creating the frame of the walls and ceiling. Basalt mineral wool is used as insulation. This is the most suitable option for thermal insulation of walls near the stove. The insulation is attached between the sheathing elements and the wall. |
| Ventilation holes are made - one in the ceiling, the second at the bottom of the wall. Stretch the mesh to protect the room from debris. |
| They use polyethylene film, aluminum foil, and for all rooms except the steam room you can choose glassine. The material is laid overlapping with an overlap of 50 mm and secured with a stapler. To ensure a reliable connection, the joints are covered with tape or adhesive tape. The preferred option for a bath is aluminum-coated films that are resistant to corrosion and high temperatures. The joints of the foil material are sealed with aluminum strips. |
| Next, the linden lining is installed and the shelves are installed. |
Without following the rules for laying lining, it is impossible to make high-quality cladding. You should know where to start laying and take into account the methods of fastening. It is also necessary to make insulation and waterproofing. There are features of installing profiles on the ceiling and walls of the bathhouse. Let's consider the order of work.
6.1. Ceiling decoration
To fix the lining to the ceiling, nails are often not used to prevent rust stains from appearing over time. Fastening is carried out using clamps and stainless steel screws. The slats are also secured with 40 mm staples. Here is a list of sequential works:
- mark the first board, remove the tenon, cut off the unnecessary longitudinal section;
- make a distance from the wall up to 2 cm, and attach a plank;
- working together is convenient and fast, but if there is no partner, you need to support the bar with a support and check the position with a level;
- fix the batten to the sheathing with self-tapping screws with a fastening step of 50 cm. Insert the head of the screw deep into the sheathing strip to hide the fasteners;
- when using clamps, the panels are attached to the sheathing, the distance between the clamps is equal to the pitch of the sheathing. In this case, the thermal insulation layer with insulation remains intact;
- The staples are installed at an angle into the groove. Each subsequent panel is installed with a tenon in the groove of the previous panel. The fasteners can be sealed by tapping the ends with a wooden board.
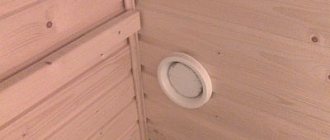
Cut holes for lamps and ventilation. When you reach the last board, measure the distance to the wall, cut a piece of the required size, and attach it with self-tapping screws.
6.2. Bath wall cladding
Wall cladding starts from the top. If you adhere to the order of installation, you can quickly and efficiently cover the surface of the walls. Leave a gap of 2 cm from the slats to the ceiling and from the floor to the finish. List of work for horizontal installation of planks:
- attach the lamella to the frame, check with a level that the position is correct;
- drill holes in the strip for self-tapping screws and attach to the frame;
- do not forget to make the required gap between the plank and the ceiling of 2 cm. It will later be covered with a plinth;
- insert staples or clamps into the groove of the installed strip;
- install the next strip so that the tenon fits into the groove of the previous strip. Check the parallelism of the fasteners;
- install the lining on clamps or brackets.
Upon completion of work, install the baseboards.
Procedure for vertical installation of lining:
- start installation from the corners - cut off the tenon from the first plank and secure it with self-tapping screws;
- do not forget to check the position with a level before fixing;
- Insert the second tenon into the groove of the first plank and tap it with a mallet to seal the fastening.
Sequentially install the remaining planks, securing them with clamps or staples. At the corners, the planks are attached end-to-end. And in log houses, at the corners of the rooms, it is necessary to make gaps for ventilation. Don't forget to install insulation.
6.3. Protection
To extend the service life of the lining, it is necessary to treat it with a special compound that creates a waterproof film and protects the wood from moisture, mold, and rot, extending its service life.
The stores have a large selection of protective products for wood processing:
- protecting from moisture and dirt - Acrylic composition. The product can withstand temperatures up to 120°, creates reliable protection against mold;
- oils and special impregnations sold ready-made;
- regular varnish - suitable for painting surfaces in the dressing room and other rooms except the steam room.
There are environmentally friendly formulations based on wax or water on sale. Before using the purchased product, you must read the instructions, since each composition differs in application methods. There are products that are applied in one layer.
How to install lining in a bathhouse
This can be done in two ways - vertically or horizontally. Let's look at each of the options.
Vertical
This method is often used by construction teams who finish a turnkey bathhouse. The planks are selected according to height and fixed without trimming. This makes it convenient to design corners. Installation does not take much time and is cheaper than horizontal. Accumulated condensate will easily flow down the slats.
The vertical arrangement of the lining allows for better heat accumulation inside the room.
The disadvantage of vertical fastening is that if at least one of the planks is damaged, the entire wall will have to be dismantled.
But there is no natural air circulation between the sheathing and the wall, so the likelihood of fungus formation increases.
Over time, the joints become noticeable as the boards dry out.
This is how it is better to finish saunas where the air is dry and there is no high humidity.
Horizontally
Fixing the slats across has a number of advantages:
- The lining is mounted with the tenon facing up. Due to this, condensation does not accumulate under the casing, and there is no risk of fungus formation.
- Under the horizontal lamellas, the sheathing is attached vertically. There is full air ventilation between the sheathing and the wall.
- The boards are easy to replace without harming the entire finish. The floor in the steam room is always wet, so the lower planks quickly become unusable. It is not difficult to carefully remove and replace them with new ones. And with vertical installation, you will have to cut off the entire bottom of the planks at the same level or even dismantle the entire wall.
- Suitable for lining a bathhouse made of fresh logs. Shrinkage will occur over several years, so the height of the walls changes. It is easy to replace horizontally the planks located at the top and bottom of the walls with new ones.
This method of installing lining will be correct when finishing a Russian bath, where high humidity always remains.
Nuances of interior decoration
Any construction process has its own subtleties. Bathroom cladding is no exception.
- In steam rooms and washing rooms, the horizontal direction of the lining is undesirable. Splashes of water entering the lock lead to darkening of the material. If the design requires just such an arrangement, the lock spike should be directed upward.
- Use galvanized fasteners. Iron analogues will quickly rust.
- So that moisture does not linger on the lining, but drains as quickly as possible, the corners and strips should be slightly rounded.
- The planks are attached at a height of 4-5 cm from the basement level (to ensure air circulation).
- The bathhouse requires a well-thought-out ventilation system. With it, the lining will last a long time, and excess moisture will not accumulate inside the room.
- To ensure that the lining retains its presentable appearance for a long time, use wood protective products.
By following the described technique, you can reproduce the installation yourself. Simple tips will help even beginners.
We wish you success, World of Para team!
What is the purpose of foil?
To achieve effective energy saving in a bathhouse, you will need to not only insulate it, but also use reflective material in the form of a special foil film. Masters claim that it helps return up to 95% of the heat into the room.
The result is that fuel for the stove is saved and the duration of the fire is reduced.
For baths, aluminum foil with a thickness of 30–300 microns is used. It is used in combination with other insulation or is already fixed as its top layer.
Therefore, before covering, they first attach insulating material to the walls and ceiling, thanks to which the heat does not escape beyond the bathhouse. An insulated steam room heats up faster and retains heat longer.
The following are the advantages of foil:
- It acts as a vapor barrier and blocks the access of moisture to the insulation. The generated steam remains on the walls of the steam room.
- Its service life exceeds 50 years. Wooden elements will begin to rot faster than the foil layer will deteriorate.
- Excellent sound insulation. Foil can absorb up to 70% of all sounds and noise.
- Fireproof raw materials. Does not burn. It will become an obstacle to the spread of fire.
- Bathrooms warm up faster and take longer to cool down.
- If you fix the insulation with a foil layer, then the foil will prevent it from falling off.
Among the disadvantages, the following should be noted:
- When there is a difference in temperature outside and indoors, condensation appears on the surface of the material.
- It is important to leave a gap for ventilation before covering. If this is not done, the resulting condensate will begin to be absorbed into the sheathing, which will lead to rotting of the lining.
- Foil has poor throughput. As users say, she is not breathing. Therefore, the rooms must have good ventilation, both forced and natural (windows, doors).
- Aluminum particles accumulate in the lungs, causing various respiratory diseases. But if you use the sauna periodically, the risk of harm to health is minimal.
To achieve the maximum effect from using foil, it is important to follow the tips for installing thermal insulation step by step.
Insulation of the main components of the dressing room
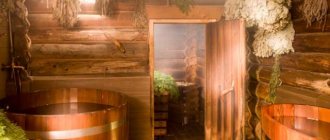
Stylishly decorated walls
So:
- The floor can be considered the basis of the dressing room, answering the question of how to line a bathhouse with clapboard to get a cozy, warm room.
- It can be noted here that there is a misconception not to worry about this problem. Many owners are ready to buy any wood as long as the price is right.
- “The greedy pays twice” and any wood can ruin all your deepest desires.
- The humidity in the dressing room is somewhat lower than the steam room, but the wood for the floors must be chosen based on this feature, that is, not subject to rotting processes - oak, larch.
- Experts do not recommend pouring the floor of the waiting room with concrete. Imagine your steamed body running out into a dressing room with a cold floor.
- You can hear objections from knowledgeable craftsmen who suggest throwing a rug under your feet.
- And yet, the appropriate temperature must be in all rooms of the bathhouse, which is largely ensured by heated floors.
- How to cover a bathhouse with clapboard video presents the sequence of work after laying the floor in the dressing room, insulating it and correspondingly treating it with an antiseptic.
- A good start to work, and quality materials provide half the job; the rest, carried out taking into account the features and nuances, ensures a positive result of the final work.
- The correct choice of wood for cladding or tongue and groove boards plays an important role. Of course, you can argue that the material on the walls is not as susceptible to moisture as on the floor, but condensation? Where will it go before it dries?
- How to place the lining on the walls is a matter of taste. The traditional technique involves a vertical arrangement; less often, owners choose a horizontal or diagonal arrangement of boards. Recently, the method of laying overlapping lining has gained popularity.
- How to cover a dressing room with clapboard for an aesthetic appearance? It’s also not a question, here the owner is a gentleman, choosing between coniferous or deciduous trees. It is important to choose the right wood treatment so that it can stand for a long time in a hot and humid room with temperature changes.
- The desired effect cannot be achieved without an insulated door, because heat has the ability to flow through the cracks of the doorway.
- The process of insulating a door is not so complicated that it requires inviting outside specialists. You need to stock up on timber, a sheet of plywood and insulation. A beam is placed around the perimeter of the door, the resulting space is laid with insulation and covered with plywood on top.
Covering saunas and baths: what's the difference?
Bathhouses and saunas differ in humidity and temperature.
In the sauna, the air is dry with humidity up to 8% with a permissible temperature range of 80–140 degrees.
In the Russian steam room, high humidity is always maintained with an indicator of up to 70%. In this case, the maximum permissible temperature is up to 100 degrees.
This difference is due to the fact that moist air has greater thermal conductivity than dry air. Therefore, in a Russian steam room, the human body heats up faster and it is easier to breathe in it.
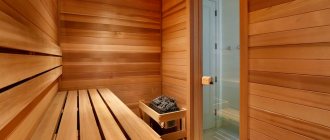
There are no restrictions on the choice of tree species for sauna cladding, with the exception of pine. Raw materials are less susceptible to moisture and therefore last longer. Installation method: vertical, horizontal.
For lining a Russian bathhouse, it is better to take lining made of alder, linden, abasha, and larch. The combination of several breeds at the same time looks beautiful. The installation method is predominantly horizontal.
Area calculation
Cladding with clapboard in a bathhouse begins with calculating the volume of necessary materials. To do this, determine the surface area to be covered. It is not recommended to subtract the area of window openings from this indicator - it is better to take wood with a reserve.
Next, calculate the area of the panel by multiplying the length by the width. The number of lamellas is determined by dividing the entire area by the area of one board. If you like to take accurate measurements, you can subtract the area of the window openings from the total area. But in this case, you will have to buy material with a reserve equal to 10% of the total calculation.
Features of lining installation depending on the bathhouse material
Brick or foam concrete baths must be insulated from the inside without fail. The exception is the use of a bathhouse only in the warm season.
Mineral and synthetic raw materials are used as insulation in the form of individual slabs or in rolls (mineral wool, expanded polystyrene).
The floor will also have to be insulated. It will be cheaper and more reliable to use expanded clay backfill.
An excellent option for heat insulators for walls and ceilings are those covered with a layer of foil. Izover, Ecoteplin (protected with foil on both sides), Thermostop, Ursa are suitable.
A brief procedure for finishing a bathhouse made of bricks or foam blocks:
- On the ceiling and walls we make lathing from wooden slats of average thickness 5-10 cm (the exact figure depends on the thickness of the insulation).
- We place insulation in the recesses of the sheathing. To prevent it from falling out, we fix it with temporary strips. If desired, fix the glassine on top.
- If the heat insulator is covered with a foil layer, then this item can be omitted. If the foil is attached separately, this should be done with an overlap of 20-25 cm, so that the overlap from the ceiling extends onto the walls, and from the walls onto the floor.
- To obtain an airtight coating, we go through all joints with metallized tape.
- We nail slats on top with a thickness of 2-4 cm, on the ceiling the thickness increases to 5 cm.
- We leave gaps for ventilation and fasten the lining.
If the exterior finishing is carried out in a brick bathhouse, if sand-lime brick was used, then for a structure made of foam blocks, exterior cladding is required. This is due to the porous structure of foam concrete. If it is constantly exposed to moisture without protection, it will begin to crumble. It would not be superfluous to insulate the outside of the room with expanded polystyrene.
In bathhouses made from fresh logs, it is possible to simply attach foil without using additional insulation, put the sheathing on top and install the lining.
In frame baths made of boards and timber, the finishing and insulation of walls occurs according to the same scheme as in brick structures.
It is important not to forget to treat the material with antiseptic solutions or impregnations after finishing.
What does tiling a steam room provide?
Gradually, more and more adherents of washing “white” began to appear, and the steam room began to be separated from the washing room. This made it possible to reduce the size of the steam room, therefore reducing the surface area of its walls and their thermodynamic potential. Now, in order to heat, they install small but powerful stoves, carefully isolating the outflow of heat into the enclosing structures. To do this, they are sheathed with a multilayer heat-insulating coating.
On the one hand, this allows:
- significantly reduce the time it takes to prepare a steam room for hygiene procedures;
- obtain various finishing options for walls and ceilings;
- use for the construction of a bathhouse all the same materials as for any other buildings;
- save on the thickness of the walls, including avoiding the use of bulky logs (could be more in girth).
If we take into account the negative aspects of covering a bathhouse with clapboards, then, on the other hand, a multilayer coating using stacked cladding excludes arrays of enclosing structures from thermophysical processes. They stop participating in the accumulation of heat, which means that they have to be heated constantly throughout the entire bath ritual. It is also more difficult to maintain the high humidity regime characteristic of traditional Russian baths.
Treatment of lining with protective agents
Sheathed walls are subjected to protective treatment.
Solutions that are water-based or contain wax are considered the safest to use. They are environmentally friendly and harmless to health. A waterproof film is formed on the surface of the lining, which prevents moisture from penetrating into the wood, extending its service life.
Before application, it is important to read the manufacturer's instructions. Often applying the product even in one layer is enough.
Using wooden paneling to cover the bathhouse, the owners create a special microclimate inside the room, which has a positive effect on the health of vacationers. Plus, wood is a natural material that fits perfectly into the interior decoration of the bathhouse, looks beautiful and smells nice.
Selection of materials
The lining for bathhouse cladding is selected depending on the tasks of a particular space. The current humidity, temperature, etc. matter. Lining is divided based on size and raw materials used.
Size:
- classic. Narrow panels. The preferred direction of fixation is vertical, since horizontal fastening visually “drops” the ceiling, making it lower. Moreover, the second option prevents the free flow of moisture. As a result, it is retained in the connecting locks;
- Euro. Heavy and wide panels (compared to classic ones). Create an interesting design. Quality characteristics are identical to its thinner counterpart. The back surface of each panel is equipped with a cut. It is aimed at relieving excess stress to avoid deformation. Result: long-term preservation of the original quality of the cladding.
The finishing material in the bath can be plastic, vinyl, wood or metal. Wooden finishes are preferred in bathhouses. Others – for facade work.
Preparing the necessary tools
For lining the inside of the bathhouse you will need the following tool:
- Chainsaw or electric saw;
- Drill or hammer drill;
- Hand saw and jigsaw;
- Screwdriver;
- Axe;
- Plane;
- Hammer;
- Doboynik;
- Clamps and clamps;
- Construction stapler.
Advice. To make plating faster and easier, experts recommend using a pneumatic tool.
For driving at an angle, the tip of the air gun has a rectangular groove. When working, the tip is placed on the edge of the tenon. The groove prevents the tip from slipping when moving along the ridge of the tenon.
Calculating the amount of work on the interior lining
The scope of work is calculated based on the area of all premises. The area of windows and doors is excluded from the result obtained.
To roughly determine the volume of lumber, use the following ratios.
| Panel length, m | Number of square meters in 1m3 | Number of packages in 1 m3 | Area covered by one package, m2 |
| 3,0 | 73,4 | 27,8 | 2,640 |
| 2,7 | 73,4 | 30,9 | 30,9 |
| 2,4 | 73,4 | 34,7 | 2,112 |
| 2,1 | 73,4 | 39,7 | 1,848 |
The result obtained is the basis for calculating the approximate cost of repairs.